Hey there! I’ve been on a nice little vacation to visit family, complete with a family reunion picnic. You know what that meant, right? Barbeque! And lots of it. It smelled fabulous! Sadly, I can’t do barbeque and while I hardly starved, I still wished I had some sort of alternative.
If you are interested in reducing the amount of meat, particularly red meat, in your diet, you’ve probably tried some or all of the vegetable-based meat substitutes available. Many are pretty darned nice, in my humble opinion. However, they are often off-limits for me since I was diagnosed with allergies to so many vegetables. The substitutes often contain vegetables I need to avoid as well as yeast. They can also be quite expensive. Still, I like the idea of a meatless burger so I set out to make my own. What resulted was a legume-based burger with plenty of seasonings, no gluten, low sodium (with the option of making it sodium free) and simple preparation.
Want to try it? Here’s what you’ll need:
· 2 15 oz cans of beans packed in water – I used Pinto and Great White Northern beans but you can choose what you like
· 2 T minced onion – I use dried minced onion to avoid adding extra moisture
· 1 T celery seed
· 1 T garlic powder
· 2 T spicy brown mustard
· 2 T lime juice
· 2 T minced fresh parsley
· Rice flour as needed to thicken
Drain your beans and using a food processor, blender, stick blender or mixer, make a smooth paste. Add all the ingredients EXCEPT the rice flour and stir until mixed. Add rice flour a little at a time (about a tablespoon) until the mixture is about the consistency of a stiff drop cookie dough. You don’t want it too stiff because it will get very dry as it cooks.
In a skillet over medium heat, heat a tablespoon or so of olive oil and drop spoonfuls of your bean mixture in. Flatten slightly with the spoon to make a patty shape. Don’t make these too large or thick since it will make them very hard to flip. Brown them well on each side (2 – 5 minutes depending on how soft your mixture is) and be sure they are heated through. You may need to add a bit more oil to the pan from time to time as you cook the patties. You should be aware that the patties will not be as firm as a meat burger. Just use a good spatula and you should have no problem. This recipe makes about 10 patties (roughly three inches across).
Serve this up as is or on a bun with any condiments you like. I like mine with mustard but mayo and ketchup or even salsa will be good, too. As you can see, this whips up in minutes but if you know you will be pressed for time, you can prepare the mixture in advance and keep it in the refrigerator until you are ready to cook.
As always, there are plenty of alternatives possible. If you need to go easy on your sodium intake, steer clear of the canned beans and cook dried beans yourself. This does add an additional step but removes a lot of the sodium. You can certainly use regular wheat flour or some other flour in place of the rice flour to tighten up the mixture, if you’d prefer. As I mentioned in the ingredients list, you can use whichever beans or combination of beans you prefer. I suppose you could use peas or lima beans if they tickle your fancy but they will give your patties a greenish color which, personally, I wouldn’t find all that appealing. Still, if you really like the flavor, go for it. If you don’t care for mustard or would like to try a different flavor profile, trade out the mustard for soy sauce, a spoonful or two of tahini and some ginger. If you’d like a bit more kick, add some diced chilies and switch out the parsley for cilantro. For an Italian taste, use oregano, more garlic and sun-dried tomatoes.
These burgers are full of flavor and packed with protein, fiber and nutrients and are very low in fat. Leftovers reheat very nicely in the microwave, too. You really can’t lose.
So, let’s go eat that!
Showing posts with label recipe. Show all posts
Showing posts with label recipe. Show all posts
Wednesday, September 24, 2008


Friday, August 29, 2008
Chocolate Mousse - dairy-free, sugar-free options
 Have I ever mentioned how much I love chocolate? Believe me, it’s a lot. I also appreciate a really nice mousse. However, since I need to avoid dairy, this isn’t so easy to find. But it isn’t impossible. In fact, it is possible to put together a very nice chocolate-mint mousse that is healthy (healthy???), very simple and delicious. Ready for this?
For 4 – 6 servings, you’ll need:
· 12 oz semi-sweet chocolate chips (or equivalent quantity of unsweetened baking chocolate)
· 2 packages of extra firm tofu (12.3 oz each) - chilled
· 8 oz tub of non-dairy whipped topping
· 2 tsp vanilla extract
· 2 tsp mint extract (I used peppermint)
· Alternative sweetener to taste (if you use unsweetened baking chocolate)
· Whipped topping and cherries to garnish
In a blender, combine the chocolate, tofu, whipped topping, vanilla and mint. Blend until smooth. If you are using semi-sweet morsels, you will not need any further sweetening. If you are using baking chocolate, you may want to add a bit of sweetener. Add just a little at a time, tasting often until it is to your taste. This should be served right away and can be topped with a dollop of whipped topping and a cherry.
As always, there are all sorts of alternatives possible. If you would rather use whipped cream instead of non-dairy topping, go for it. Don’t like mint? How about almond extract or orange extract? You could use your favorite liqueur, as well. Not fond of chocolate? Try soy nut butter, peanut butter, almond butter, white chocolate or even butterscotch chips. Of course, if you use the white chocolate or the butterscotch chips, be aware that they will be considerably sweeter and may not be available sugar-free.
As I mentioned, this is something that should be served right away since tofu can separate in the refrigerator. However, if you do need to refrigerate it and it separates, it can be blended again and will be just fine. Best of all, this is such a simple dessert, you can toss it together at a moment’s notice.
So, let’s go eat that!
Sunday, August 24, 2008
Avocado and Salmon Salad
Ever have one of those weeks? A stretch of days where everything you have to do snowballs and knocks you flat so that, by the weekend, the last thing in the world you want is to work hard for your dinner? I’m betting you have. Probably more than one week like that. Well, I just had one of those weeks and I found myself too tired to even bother with any sort of take away. I wanted something simple, flavorful and healthy but I didn’t want to expend a lot of effort. This avocado and salmon salad was the very thing. Non-dairy, no sugar added, egg-free, gluten-free, low sodium and easily adaptable, this salad is a wonderful and healthy dish that can be whipped up in literally minutes. Here’s how it goes.
You’ll need:
· 1 ripe avocado (it should be give a bit in your fingers but the skin should be undamaged)
· ¼ tsp ginger (I used ground ginger but fresh ginger is great if you have it on hand)
· 1 tsp celery seed
· ½ tsp salt (can be omitted)
· 2 T lime juice
· 2 tsp low sodium soy sauce
· 1 – 2 tsp minced fresh parsley
· ¼ cup minced onion (I used a sweet onion but you can use any onion, including scallions if you’d like)
· 6 oz canned salmon, drained (this can be rinsed and drained if it is more sodium than you want to have)
Mix together the avocado, ginger, celery seed, salt, lime juice, soy sauce and parsley until fairly smooth. It will have a consistency similar to mayonnaise. Add the onion and salmon and mix well.
That’s it! This is excellent on crackers, wrapped in lettuce leaves, on toast points, wrapped in a tortilla or on a simple sandwich. Want to hear about alternatives? No problem. Switch out the salmon for tuna, if you’d like. Add additional diced vegetables such as sweet peppers or celery. You can add diced apple and toasted sunflower seeds, as well, if you’d like a bit more crunch. Very adaptable.
I don’t suppose I need to remind you of the benefits of using avocado in place of mayonnaise, do I? In case you haven’t already heard, avocado, while reasonably high in fat, is loaded with monounsaturated fats which are quite healthy when eaten in moderation. Monounsaturated fats can even help reduce blood cholesterol. Additionally, avocados are high in B vitamins which are so good for many body functions as well as overall energy levels.
So, if you’re in a bit of a hurry for a healthy, flavorful meal that is a bit of something different, give this salad a try. Let’s go eat that!
You’ll need:
· 1 ripe avocado (it should be give a bit in your fingers but the skin should be undamaged)
· ¼ tsp ginger (I used ground ginger but fresh ginger is great if you have it on hand)
· 1 tsp celery seed
· ½ tsp salt (can be omitted)
· 2 T lime juice
· 2 tsp low sodium soy sauce
· 1 – 2 tsp minced fresh parsley
· ¼ cup minced onion (I used a sweet onion but you can use any onion, including scallions if you’d like)
· 6 oz canned salmon, drained (this can be rinsed and drained if it is more sodium than you want to have)
Mix together the avocado, ginger, celery seed, salt, lime juice, soy sauce and parsley until fairly smooth. It will have a consistency similar to mayonnaise. Add the onion and salmon and mix well.
That’s it! This is excellent on crackers, wrapped in lettuce leaves, on toast points, wrapped in a tortilla or on a simple sandwich. Want to hear about alternatives? No problem. Switch out the salmon for tuna, if you’d like. Add additional diced vegetables such as sweet peppers or celery. You can add diced apple and toasted sunflower seeds, as well, if you’d like a bit more crunch. Very adaptable.
I don’t suppose I need to remind you of the benefits of using avocado in place of mayonnaise, do I? In case you haven’t already heard, avocado, while reasonably high in fat, is loaded with monounsaturated fats which are quite healthy when eaten in moderation. Monounsaturated fats can even help reduce blood cholesterol. Additionally, avocados are high in B vitamins which are so good for many body functions as well as overall energy levels.
So, if you’re in a bit of a hurry for a healthy, flavorful meal that is a bit of something different, give this salad a try. Let’s go eat that!
Friday, August 15, 2008
Tomato-Free Baked Beans
Mmmm… baked beans. I love them. Unfortunately, most canned baked beans include tomato sauce and tomatoes are a no-go for me. There are a few tomato-free brands but that doesn’t give a person much variety. So, since my son loves legumes of nearly all types (he’s not so into garbanzo beans but what the heck) and I like them too, I thought it might be fun to try something a little different and go for a flavor that might even entice my husband who really isn’t such a bean fan.
Here’s what I did. You’ll need:
· 6 C dry Great Northern beans
· 1 quart chicken stock
· 1 clove of garlic, minced
· 2 T lime juice
· 8 oz can of pineapple chunks in juice (NOT syrup)
· 4 T maple syrup (I used sugar-free maple syrup)
· 1 T rice vinegar
· 2 T lite soy sauce
· 1 tsp celery salt
· ¼ sweet onion (medium to large)
· Salt and pepper to taste
This is not a quick recipe but it is fairly low effort. First of all, you’ll need to soak the beans in water overnight. After that, drain away the water and put the beans in a large stock pot with the chicken stock, garlic, lime juice and a dash of salt and pepper. Bring to a low boil for about an hour.
Add the pineapple chunks with juice, maple syrup, vinegar, soy sauce, celery salt and onion. At this point, you can continue cooking the beans on the stove top or transfer them to the slow cooker. If you choose the slow cooker, be aware that you will need to allow the beans to cook for 7 – 8 hours. Certainly, the quickest method is on the stove top (about another hour) but the slow cooker does allow you to leave them while you go about your business. In the end, you need to cook the beans until they are tender.
Near the end of the cooking process, taste and add more salt and pepper as desired.
This is a great side dish for a pot luck since it makes a LOT of beans. If you are using it as a side dish for a smaller group, cut the recipe in half. My son will happily eat these as a main dish with a green salad and I like them as a quick, satisfying lunch. As you might imagine, these beans are great as leftovers though I have never tried freezing them. You can certainly give that a try but don’t be too disappointed if the beans are made mushy by the freezing and thawing. Of course, you may not mind that so more power to you.
Alterantives and additions? You bet. You can switch out beef or turkey stock for the chicken stock. You can add other vegetables to make it more of a stew. Carrots and celery would be great in this. If you prefer more of a soup instead of a thicker stew or baked bean casserole texture, add more stock.
Legumes are fantastic, healthy protein and fiber sources so, let’s go eat that!
Here’s what I did. You’ll need:
· 6 C dry Great Northern beans
· 1 quart chicken stock
· 1 clove of garlic, minced
· 2 T lime juice
· 8 oz can of pineapple chunks in juice (NOT syrup)
· 4 T maple syrup (I used sugar-free maple syrup)
· 1 T rice vinegar
· 2 T lite soy sauce
· 1 tsp celery salt
· ¼ sweet onion (medium to large)
· Salt and pepper to taste
This is not a quick recipe but it is fairly low effort. First of all, you’ll need to soak the beans in water overnight. After that, drain away the water and put the beans in a large stock pot with the chicken stock, garlic, lime juice and a dash of salt and pepper. Bring to a low boil for about an hour.
Add the pineapple chunks with juice, maple syrup, vinegar, soy sauce, celery salt and onion. At this point, you can continue cooking the beans on the stove top or transfer them to the slow cooker. If you choose the slow cooker, be aware that you will need to allow the beans to cook for 7 – 8 hours. Certainly, the quickest method is on the stove top (about another hour) but the slow cooker does allow you to leave them while you go about your business. In the end, you need to cook the beans until they are tender.
Near the end of the cooking process, taste and add more salt and pepper as desired.
This is a great side dish for a pot luck since it makes a LOT of beans. If you are using it as a side dish for a smaller group, cut the recipe in half. My son will happily eat these as a main dish with a green salad and I like them as a quick, satisfying lunch. As you might imagine, these beans are great as leftovers though I have never tried freezing them. You can certainly give that a try but don’t be too disappointed if the beans are made mushy by the freezing and thawing. Of course, you may not mind that so more power to you.
Alterantives and additions? You bet. You can switch out beef or turkey stock for the chicken stock. You can add other vegetables to make it more of a stew. Carrots and celery would be great in this. If you prefer more of a soup instead of a thicker stew or baked bean casserole texture, add more stock.
Legumes are fantastic, healthy protein and fiber sources so, let’s go eat that!
Thursday, July 31, 2008
Chocolate Chip Soda Bread (dairy free, chocolate free options)
 I bet you thought I forgot about the soda bread, didn’t you? Well, I most certainly did not.
 I wanted something that was more dessert-like but still a bread. Since yeast is right out for me, I turned to a traditional Irish Soda Bread recipe and went from there. I used some whole wheat flour for flavor and texture and almond milk for flavor as well. I added chocolate chips but dried fruits will work, too.
Let’s break it down. Start by preheating your oven to 375 degrees.
You’ll need:
· 2 C all purpose flour
· 2 C whole wheat flour
· 1 T baking soda
· 2 T sugar (I haven’t had a lot of luck using sucralose for this but you might do better with saccharine)
· 2 tsp salt
· 1 T butter or margarine
· 1 ½ - 2 C milk or dairy alternative such as soy, rice or almond milk (you’ll start with 1 ½ C and if you need more you’ll go as high as 2 C)
· 6 oz semi-sweet chocolate chips (You may use carob or dried fruits such as cherries, cranberries or raisins if you prefer)
Combine the dry ingredients in a large bowl. Make a sort of well in the center and add 1 1/2 cups of the milk and the butter. I like to have the butter softened for this. Not melted, but soft. Mix lightly and quickly with a fork. You are looking for a dough that is soft but not too sticky. If you need to add more milk, you can add up to half cup additional milk until the texture of the dough is right. Fold in the chocolate chips.
Turn the dough out onto a floured board (Don’t have a board? Use your counter or table.) and knead for about one minute.
Place the dough onto a cookie sheet (I like to line mine with parchment paper or a silpat) and shape into a circle about 1 ½ “ thick and score a cross into the top.
Bake for 40 – 45 minutes. Cool on a wire rack. Be sure to brush the top and sides with butter or margarine while it is still warm to keep the crust from getting hard.
That’s it! It’s simple and not nearly as time consuming as it sounds. It makes a very nice snack bread or even a breakfast bread. While I don’t recommend putting slices in your toaster, putting a couple slices under the broiler would be nice. Then, served with just a bit of butter or margarine and possibly some honey, you’d have one really great snack.
So, let’s go eat that!
Friday, July 25, 2008
Creamy Almond Onion Soup (dairy free)
 I want to begin with some overdue kudos, if I may. Recently, Corrine of "A Gourmet Love Affair" (http://www.gourmetloveaffair.com/) gifted me with the lovely honor of a "You Make My Day" award. How exciting and flattering! In the spirit of this award, I'm passing it on to some other food bloggers whose blogs are filled with good information, great recipes and are run by all-around good folks.
"Peanut Butter and Julie" (http://www.peanutbutterandjulie.typepad.com/)
"Life After Gluten" (http://lifeaftergluten.blogspot.com/)
"Play With Food" (http://play-with-food.blogspot.com/)
"Fishmonger Ran" (http://dontfearfish.blogspot.com/)
Go check out their blogs and see why they make my day!
Now, how about that soup?
 Ordinarily, I would associate a steaming bowl of onion soup with a very cold day. However, my local grocery store had some really beautiful sweet onions the other day and that changed my mind about it. After all, who am I to turn down good sweet onions when they beckon that way?
However, I didn’t really want the usual French Onion soup with the cheese and all. Though I do make it from time to time, I admit, it is never all that much fun for me. My husband and son love it but since I need to use soy cheese and I haven’t yet found a suitable substitute for the yeast-risen bread, it just isn’t the same dish for me and, sadly, I’m not wild about the alternative results. This time, I set out to do something a little different and I must say, I was pleased with the results.
Here’s what you’ll need to make soup for four or five:
· 2 large sweet onions
· 2 – 3 T margarine or butter
· 1 tsp salt
· 24 oz chicken stock or broth (you may use beef or vegetable instead, if you prefer)
· Standard White Sauce – for this, you’ll need 2 T margarine or butter, 2 T flour (you may use an equivalent amount of cornstarch, rice starch or quick-cooking tapioca if you want to avoid wheat flour), 1 ½ C plain almond milk (you can use regular milk or another substitute but you’ll lose the almond part of this dish), dash of ground black pepper, 1 tsp celery seed, salt to taste
· Parsley and/or slivered almonds for garnish
Cut the tops and roots from your onions and halve them. Slice them about ¼ “ thick.
In a large stock pot, melt the margarine or butter and add the onion and salt. Allow the onions to cook over medium high heat, stirring occasionally. You want to get a light golden color and a bit of caramelization. There will be a bit of a crust on the bottom of the pot but we’ll get that in the next step.
Once the onions have caramelized a bit (but don’t burn them), reduce the heat to medium low and add the broth. Stir well and scrape the crust from the bottom of the pan. You really don’t want to lose the flavor there. Cover and allow this to simmer for about a half hour, stirring occasionally, until the onions a very soft.
In the meantime, you’ll need to make a standard white sauce. To do this, melt 2 T butter or margarine in a saucepan over medium heat. Add in 2 T flour (or alternative), celery seed and pepper and stir until smooth. You will smell a light toasted smell but careful not to burn this. Add the almond milk all at once. Stir until smooth and simmer until thickened and bubbly. This will need nearly constant stirring so don’t walk away. Your onions and broth are largely taking care of themselves now so you’ll have time to do this. Taste once you have added the milk and add a bit of salt if needed. Once the white sauce is ready, turn off the heat and keep stirring until it has stopped bubbling. If you aren’t ready to add it to the soup right away, stir it occasionally to keep it from forming a skin.
When the onions are very soft, slowly add the white sauce, stirring constantly. The soup is ready! Garnish with fresh snipped parsley and/or slivered almonds.
If you like thicker, creamier soup, you can either cut the onion and broth part of the recipe in half or double the white sauce recipe. It depends on how much soup you want to make. For smoother texture, you can run the onions and broth in the blender before adding the white sauce. Personally, I prefer the texture of the onion pieces but it will taste great either way. This soup is very nice on its own but is also good served with nice crusty bread or rolls.
Let’s go eat that!
Wednesday, July 23, 2008
Almost Asian Stew
Okay, this isn’t precisely Asian and it isn’t exactly stew, but once you actually sit down with a bowl of it, I think you’ll see my reasoning behind the name. I'd have a picture for you but the last time I made this for the family, we dug right in and ate it before we remembered anything about taking a picture. I'll have to remember next time around.
This is another dish that is very flexible and simple to adapt to a variety of tastes and specific diets. You’ll be steaming vegetables for this and if you don’t have a steamer or one for your microwave, don’t fret. A regular microwavable cereal bowl and some plastic wrap to cover it will work just fine.
So, here’s what you’ll need for dinner for about four people:
· 1 – 1 ½ lbs. stew meat (I like beef but pork could be used) or boneless, skinless chicken breast cut in 1” cubes
· 8 oz beef or chicken broth (or stock or bouillon equivalent)
· 3 T low-sodium soy sauce
· 1 clove garlic, minced
· ¼ - ½ C each – broccoli flowerets, red bell pepper, yellow bell pepper, carrots, celery, green onion, snow pea pods
· 1 package chow mein noodles
· Toasted sesame seeds to garnish
In a skillet (at least 12” with a lid), brown the meat. If your skillet is not non-stick, you may need just a little oil but don’t use much. You’ll keep cooking in that same skillet so a bit of sticking is fine but a lot of oil is not and won’t make for a nice broth later.
Once the meat is lightly browned, add the broth and one cup of water. Drop the cooking temperature to low. Add the soy sauce and garlic. Cover and let the meat simmer for an hour. Check every 15 – 20 minutes and add water if your liquid seems to be cooking away. Add the green onions in the last 20 minutes or so.
Prepare your vegetables by cutting them into roughly ¾” – 1” pieces. I like to cut the carrots and celery on the bias because it looks nice. Carrot slices should be no more than ½” thick or they will take too long to cook.
If all the diners are able to eat all the vegetables, steam them in one bowl in your microwave. If you’re using a bowl and plastic wrap instead of a steamer, leave the plastic open along one side an inch or so to vent. This should take 3 -4 minutes on high power. You want the vegetables soft-ish but they should still have just a bit of snap. I guess you’d call it al dente. If not everyone can eat all the vegetables, steam them in separate bowls and everyone can add just the vegetables they want to their own bowl of stew when the time comes.
Cook the noodles according to package directions.
Dish up a serving of noodles into a soup bowl and ladle some meat and broth over them. Add some of the vegetables and toss lightly. You can sprinkle toasted sesame seeds over the top before serving.
Ready for the variations?
You can use any fresh vegetable you like in this. A handful of shredded cabbage (uncooked), added in just before serving, gives some nice texture. Cauliflower would be a good addition, too. If you like ginger, you could add ½ - 1 tsp when you add the broth to the meat. It isn’t required and goes with personal taste.
This could be made with seafood though you wouldn’t want to simmer it so long, of course. If you try fish or seafood, go with a vegetable broth.
If you are fresh out of chow mein noodles, go ahead and use spaghetti. I’ll never tell. If noodles don’t really get you excited, you can serve this over cooked brown rice, instead.
If you’d like a gravy rather than a broth, you can add a tablespoon of flour, cornstarch or tapioca to the cooking liquid in the last 15 minutes of cooking, stirring constantly to avoid lumps.
To help streamline this dish and avoid a lot of messing about in the kitchen after a long day, the vegetables can be cut and made ready for cooking in advance. The cooking isn’t really labor intensive, though you will still need to allow enough time for the meat to simmer and become tender.
Now I’m hungry. So, let’s go eat that!
This is another dish that is very flexible and simple to adapt to a variety of tastes and specific diets. You’ll be steaming vegetables for this and if you don’t have a steamer or one for your microwave, don’t fret. A regular microwavable cereal bowl and some plastic wrap to cover it will work just fine.
So, here’s what you’ll need for dinner for about four people:
· 1 – 1 ½ lbs. stew meat (I like beef but pork could be used) or boneless, skinless chicken breast cut in 1” cubes
· 8 oz beef or chicken broth (or stock or bouillon equivalent)
· 3 T low-sodium soy sauce
· 1 clove garlic, minced
· ¼ - ½ C each – broccoli flowerets, red bell pepper, yellow bell pepper, carrots, celery, green onion, snow pea pods
· 1 package chow mein noodles
· Toasted sesame seeds to garnish
In a skillet (at least 12” with a lid), brown the meat. If your skillet is not non-stick, you may need just a little oil but don’t use much. You’ll keep cooking in that same skillet so a bit of sticking is fine but a lot of oil is not and won’t make for a nice broth later.
Once the meat is lightly browned, add the broth and one cup of water. Drop the cooking temperature to low. Add the soy sauce and garlic. Cover and let the meat simmer for an hour. Check every 15 – 20 minutes and add water if your liquid seems to be cooking away. Add the green onions in the last 20 minutes or so.
Prepare your vegetables by cutting them into roughly ¾” – 1” pieces. I like to cut the carrots and celery on the bias because it looks nice. Carrot slices should be no more than ½” thick or they will take too long to cook.
If all the diners are able to eat all the vegetables, steam them in one bowl in your microwave. If you’re using a bowl and plastic wrap instead of a steamer, leave the plastic open along one side an inch or so to vent. This should take 3 -4 minutes on high power. You want the vegetables soft-ish but they should still have just a bit of snap. I guess you’d call it al dente. If not everyone can eat all the vegetables, steam them in separate bowls and everyone can add just the vegetables they want to their own bowl of stew when the time comes.
Cook the noodles according to package directions.
Dish up a serving of noodles into a soup bowl and ladle some meat and broth over them. Add some of the vegetables and toss lightly. You can sprinkle toasted sesame seeds over the top before serving.
Ready for the variations?
You can use any fresh vegetable you like in this. A handful of shredded cabbage (uncooked), added in just before serving, gives some nice texture. Cauliflower would be a good addition, too. If you like ginger, you could add ½ - 1 tsp when you add the broth to the meat. It isn’t required and goes with personal taste.
This could be made with seafood though you wouldn’t want to simmer it so long, of course. If you try fish or seafood, go with a vegetable broth.
If you are fresh out of chow mein noodles, go ahead and use spaghetti. I’ll never tell. If noodles don’t really get you excited, you can serve this over cooked brown rice, instead.
If you’d like a gravy rather than a broth, you can add a tablespoon of flour, cornstarch or tapioca to the cooking liquid in the last 15 minutes of cooking, stirring constantly to avoid lumps.
To help streamline this dish and avoid a lot of messing about in the kitchen after a long day, the vegetables can be cut and made ready for cooking in advance. The cooking isn’t really labor intensive, though you will still need to allow enough time for the meat to simmer and become tender.
Now I’m hungry. So, let’s go eat that!
Monday, July 21, 2008
Mint Chocolate Pesto (non-dairy and no sugar options)
 There is nothing secret about my sincere affection for chocolate. I am a confirmed chocophile. Unfortunately, much of the chocolate that is prepared and ready to eat as is contains milk or milk products. Not cool if you have a dairy allergy or a sensitivity to dairy. So, what is an allergic chocophile to do? Try this nifty little desert pesto.
Here’s how it goes. You’ll need:
· 1 square unsweetened baking chocolate (or equivalent amount of carob)
· Scant ¼ C blanched, unsalted almond pieces
· 1 T sugar (or substitute)
· 2 C whole mint leaves
· 1/8 C canola oil (or other light oil, NOT olive)
As you may have noticed, this is a variation of a standard pesto recipe. Of course, we’re substituting mint for basil and chocolate for garlic but the basic concept is the same. So, here we go.
Put all ingredients into your food processor. You can use a blender for this but I find it is easier to work with the processor. Either way, it will work just fine. Mix until the chocolate and mint is fairly smooth. The almonds will still be chunky but that’s alright. If you want a really smooth spread, go ahead and puree until the almonds are completely broken. Personally, I like the texture.
This is best served chilled though it can be eaten right away. I like to serve this with plain croissants or, as in the picture, whole wheat tortillas I’ve cut into pieces and fried crisp. To make the tortilla chips, heat canola or other light oil in your skillet (about ¼” deep) , cut the tortillas into eight pie wedges and lightly fry them golden brown. They are really good served warm with the chilled chocolate mint pesto.
As you could see in the ingredients list, there are a couple substitutions possible. You can substitute carob or artificial chocolate for the baking chocolate. However, if your alternative is sweetened, omit the tablespoon of sugar. If almonds are a problem, try walnuts, pecans, peanuts or hazelnuts. You could omit the nuts entirely and have a much smoother spread. If wheat is a problem for you, try this spread on rice crackers or cakes.
This can be made the day before which is a nice option when you’re planning a party. The recipe above makes about ½ cup but it is easily doubled.
Next time you’re in the mood for a little something chocolate, let’s go eat that!
Friday, July 18, 2008
Not-Just-Camp-Cooking Pouch Dinners
 If you’ve ever done any camping, you almost certainly wrapped some meat and a few vegetables in foil and cooked them in the coals of your fire. It’s a common and simple campfire cookout. But it’s much more than that, really. It is an enormously adaptable dinner that can be easily assembled for a variety of dietary considerations. With a bit of creativity, you can really elevate this meal from its humble campout status to something pretty special.
We’ll start with the way I made it for dinner last night and talk about the many variations from there. To do it the way I did, you’ll need:
· ½ lb lean beef, cubed - I like to use stir fry or chop suey beef since it is already trimmed and cut quite small for quick cooking.
· Red-skinned potatoes – approximately one per person
· Carrots, bell peppers, green beans, celery, onion, broccoli flowerets
· Greek salad dressing
First, I sliced the potatoes (though I did not peel them) fairly thin. You want to keep vegetable pieces reasonably small and thin to reduce cooking time. I also cut the other vegetables into roughly 1” pieces.
Once my vegetables were ready, I laid out pieces of foil. The pieces should be about 18” long so you’ll have room to fold it tightly over the food. Once the foil was ready, I began assembling. I like to lay out the potato slices first. This gives the packet a firm base and puts the potatoes in closer contact with the heat for faster cooking. Once I had a good layer of potato slices in the center of the foil (laid out in a rectangle allowing plenty of room on all sides for folding up later), I added my carrot slices, beef pieces, onion pieces, green beans, bell pepper pieces and broccoli flowerets. You’ll notice I put the vegetables I don’t want to overcook on top.
Over all this, I poured 2 – 3 T Greek salad dressing (this was a bottled dressing from the grocery but you can make your own) and carefully folded the foil. I like to ‘lock’ the foil together by folding two sides together and rolling it down to the food and then closing either end.
Since I was making three pouches and each needed different ingredients, I marked the pouches with toothpicks poked through the foil. My son’s pouch had no meat but more green beans, as is his preference. My husband’s had some of everything but only a few potato slices since starchy foods are not so good for diabetics. Mine had meat and only those vegetables to which I was not allergic.
Once the pouches were ready, I placed them on the grill which I had at about medium to medium high heat. Every grill adjusts differently so get yours going accordingly. Do close the grill’s lid to keep your heat in. These pouches cooked for about an hour. You can carefully undo the foil to check for doneness and rewrap them to continue cooking. Just work carefully and use your tongs. We like our vegetables to be a bit ‘al dente’ so an hour was fine. If you like yours softer, you’ll want to leave them on the grill longer. The cooking time can be reduced if you steam your vegetables in the microwave for two or three minutes before adding them to the pouches. However, this will change the flavor slightly. Not a bad thing but it will be different.
Now for the variations. You can add any vegetables you like to these pouches. You can even add some of your favorite fruits. Instead of beef, you can substitute chicken, pork or turkey. Ground meat can be used to make a patty instead of cubed meat. Just make sure you check the temperature of your meat to insure doneness. The salad dressing is not required and you can just salt and pepper the food and allow it to cook in its own juices. You can also use a different dressing (though creamy dressings aren’t really the thing for this meal) or add some other liquid. Wine, vinegar or fruit juice would work well.
At this time of year, I like to cook these on the grill to avoid all the extra heat in the house. However, these can certainly be cooked indoors in your regular oven (at about 375 degrees F) or in a toaster oven.
The really lovely part is that everyone can have just what they like and it doesn’t require a lot of additional preparation. Kids love to put their own pouches together with the vegetables they like best. If you are concerned about the amount of foil you’re using and would like to conserve a bit, you can make this meal in a covered pan. However, this really works best when everyone eating can share the same ingredients. Otherwise, plan to use separate small pans.
With as many variations as you can dream up, this simple form of campout cooking can become a staple meal in your household. It can be dinner for one or for a crowd with minor adjustments and leftovers reheat well the next day.
So, let’s go eat that!
Wednesday, July 16, 2008
Fried Tofu Sticks

Having established that soy protein is a good option to replace some of the higher fat proteins we tend to eat, it seemed only right that I offer you a tofu recipe right away, yeah? How about some fried tofu?
In the past, when someone said ‘tofu’ we’d automatically think of pale, gelatinous cubes scattered among our otherwise innocent salad greens. It wasn’t all that appetizing to many. The texture was squishy and the flavor was largely non-existent. Fortunately, tofu has become more mainstream and we are more accustomed to seeing it in stir fry and casseroles. Still, for lots of people, tofu’s rubbery texture is off-putting and doesn’t really inspire us to try it in new and different ways.
Alton Brown of the Food Network did a great show on tofu and I wish I could remember all his clever tricks and recipes. However, I can recommend his cookbooks as being entertaining and informative. I do remember that he talked about marinating the tofu to give it flavor before frying it or using it in other recipes. It’s a smart idea and one I’ve used here. Here’s how it goes:
You’ll need:
· Extra firm tofu – The grocery store near me carries Mori-Nu tofu in shelf-stable packages of 12.3 oz each but whichever brand and package size you find will be fine.
· 1 C orange juice
· ¼ - ½ cup rice wine – seasoned or not, your choice
· 1 tsp each – garlic powder, onion powder, celery seed, celery salt
· 12” skillet – non-stick is not necessary
· Oil – you can choose whatever type you like best – enough to be about ¼” deep in your skillet
· All-purpose flour – about 1 C for dredging
· Salt and pepper to taste
To make the marinade, mix together the orange juice, vinegar, garlic, onion, celery seed and celery salt in a container with a tight-fitting lid. It is best if this is wider than it is tall since it makes it easier to get the tofu in and out and maximizes its contact with your marinade.
Drain the tofu and slice it into strips that are about ½ inch thick. Carefully place the strips into your container of marinade. Cover it tightly and place it in the refrigerator for at least two hours. Longer is better and I try to leave it in at least six hours. You could prepare this in the morning before going to work and it would be just right for cooking when you get home in the evening.
When you are ready to cook, heat your oil (I used canola for this since I wanted to really taste the orange) in the skillet on medium to medium-high heat. While the oil is heating, lightly dredge the tofu strips in the flour that you’ve seasoned with the salt and pepper. A regular dinner plate works very well for this. Since the tofu is soft and rather fragile, I suggest you get right in there with your fingers to do the dredging.
Carefully place the strips into the hot oil, a few at a time. Cook until the strips are golden brown, flipping them with a fork. Again, the tofu is a bit fragile so tongs are sort of overkill here. When they are browned on all sides, remove to a plate covered with paper towels to drain and cool. I like these served with honey for dipping.
These strips are best eaten warm since the crisp coating won’t really stay crisp once it is cooled. However, if you don’t mind that, refrigerate the leftovers and have them on a salad for lunch the next day.
Ready for some variations? The marinade is VERY adaptable. Change out the juice, the vinegar and spices for any other flavors you like. You can even use a ready-made vinaigrette dressing. If fruit juice is too sweet for your taste, use more vinegar, a bit of water and some soy or teriyaki sauce. If you do that, consider a sweet and sour sauce for dipping. Try lemon juice, vinegar, garlic and oregano in your marinade and serve Italian dressing for dipping. How about lime juice, vinegar and cilantro and then serve with salsa? Let your imagination go! If you’d like a crisper coating, you can make a batter and deep fry your strips.
The tofu will take on a lovely flavor and though it remains soft, the crisp exterior is a nice contrast. It makes a fun finger food for kids and a funky new appetizer before dinner. Try combinations of flavors that will compliment your dinner courses.
So, now that you know how to serve up a protein-rich soy snack, let’s go eat that!
In the past, when someone said ‘tofu’ we’d automatically think of pale, gelatinous cubes scattered among our otherwise innocent salad greens. It wasn’t all that appetizing to many. The texture was squishy and the flavor was largely non-existent. Fortunately, tofu has become more mainstream and we are more accustomed to seeing it in stir fry and casseroles. Still, for lots of people, tofu’s rubbery texture is off-putting and doesn’t really inspire us to try it in new and different ways.
Alton Brown of the Food Network did a great show on tofu and I wish I could remember all his clever tricks and recipes. However, I can recommend his cookbooks as being entertaining and informative. I do remember that he talked about marinating the tofu to give it flavor before frying it or using it in other recipes. It’s a smart idea and one I’ve used here. Here’s how it goes:
You’ll need:
· Extra firm tofu – The grocery store near me carries Mori-Nu tofu in shelf-stable packages of 12.3 oz each but whichever brand and package size you find will be fine.
· 1 C orange juice
· ¼ - ½ cup rice wine – seasoned or not, your choice
· 1 tsp each – garlic powder, onion powder, celery seed, celery salt
· 12” skillet – non-stick is not necessary
· Oil – you can choose whatever type you like best – enough to be about ¼” deep in your skillet
· All-purpose flour – about 1 C for dredging
· Salt and pepper to taste
To make the marinade, mix together the orange juice, vinegar, garlic, onion, celery seed and celery salt in a container with a tight-fitting lid. It is best if this is wider than it is tall since it makes it easier to get the tofu in and out and maximizes its contact with your marinade.
Drain the tofu and slice it into strips that are about ½ inch thick. Carefully place the strips into your container of marinade. Cover it tightly and place it in the refrigerator for at least two hours. Longer is better and I try to leave it in at least six hours. You could prepare this in the morning before going to work and it would be just right for cooking when you get home in the evening.
When you are ready to cook, heat your oil (I used canola for this since I wanted to really taste the orange) in the skillet on medium to medium-high heat. While the oil is heating, lightly dredge the tofu strips in the flour that you’ve seasoned with the salt and pepper. A regular dinner plate works very well for this. Since the tofu is soft and rather fragile, I suggest you get right in there with your fingers to do the dredging.
Carefully place the strips into the hot oil, a few at a time. Cook until the strips are golden brown, flipping them with a fork. Again, the tofu is a bit fragile so tongs are sort of overkill here. When they are browned on all sides, remove to a plate covered with paper towels to drain and cool. I like these served with honey for dipping.
These strips are best eaten warm since the crisp coating won’t really stay crisp once it is cooled. However, if you don’t mind that, refrigerate the leftovers and have them on a salad for lunch the next day.
Ready for some variations? The marinade is VERY adaptable. Change out the juice, the vinegar and spices for any other flavors you like. You can even use a ready-made vinaigrette dressing. If fruit juice is too sweet for your taste, use more vinegar, a bit of water and some soy or teriyaki sauce. If you do that, consider a sweet and sour sauce for dipping. Try lemon juice, vinegar, garlic and oregano in your marinade and serve Italian dressing for dipping. How about lime juice, vinegar and cilantro and then serve with salsa? Let your imagination go! If you’d like a crisper coating, you can make a batter and deep fry your strips.
The tofu will take on a lovely flavor and though it remains soft, the crisp exterior is a nice contrast. It makes a fun finger food for kids and a funky new appetizer before dinner. Try combinations of flavors that will compliment your dinner courses.
So, now that you know how to serve up a protein-rich soy snack, let’s go eat that!
Friday, July 11, 2008
Creamy Dill Dressing

For most special diets, the more time you spend in the produce area at the market, the better. Unfortunately, this isn’t the case if you have multiple food allergies or sensitivities. Instead, the array of fruits and vegetables that you shouldn’t have can be a little frustrating.
This, however, is the time when you should remember to make the most of the foods you can have by choosing the freshest available and preparing them in a variety of ways. Mostly, I prefer to eat many fruits and vegetables uncooked. That doesn’t mean there isn’t some preparation involved, though. Salads and slaws are big favorites in our house and all sorts of fruits and vegetables can go into them if you combine them with the right dressings.
For a spinach salad or cabbage slaw, I like a dressing with a bit of a vinegar kick. This is easy when you use a simple vinaigrette. But what about something creamy? If you are avoiding dairy, many of the creamy dressings available are off-limits. Not a problem. Read on and we’ll make a really nice, fresh-tasting creamy dill dressing that is easily adaptable with a non-dairy option and even a no-sugar-added variation.
For about a ½ cup of dressing (which is easily enough to do a cabbage slaw or spinach salad for three or four), here’s what you’ll need:
· 3 T sour cream or non-dairy sour cream substitute
· 2 T apple cider vinegar
· 1 T honey
· 1 T fresh dill
Mix together the sour cream, vinegar and honey until well blended. Gently stir in the dill.
That’s it! The dressing is ready to go immediately but if you can make it up in advance and allow the flavors to mix at least an hour, that’s always a good thing.
Now, how about alternative ingredients? No problem. If dairy isn’t an issue, use regular sour cream. There are several non-dairy sour cream substitutes available if you are avoiding dairy. However, I have yet to find one that did not rely heavily on soy as an ingredient. If you have problems with soy as well as dairy, I’m afraid you will be better off with vinaigrette. Of course, always watch for new products! Soy is a such a common allergen, I am confident someone will come up with a non-dairy alternative before long. For a no-sugar-added option, switch out the honey for whichever sugar substitute you prefer. Be prepared to add a few drops of water if the dressing seems too thick. Of course, you can try a different vinegar for a flavor variation, as well. Also, if dill is on your list of things to avoid, try another fresh herb such as thyme, cilantro or even mint. This will take some experimentation to find the combination you like best but the basic recipe remains the same.
This is a nice baked potato topping, too. The vinegar gives it a bit of a punch over plain sour cream. It is also a nice dipping sauce for veggie sticks (and we all know how kids love to dip their vegetables!) or even crackers and chips.
See how many ways you can use this basic dressing and tell us about it. Let’s go eat that!
Wednesday, July 9, 2008
The Soda Bread That Turned Into Cherry-Lime Chutney
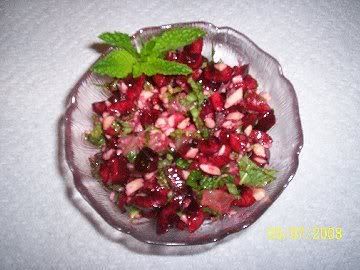
Folks, I have a confession to make.
This was supposed to be a post about a really fun chocolate chip variation on Irish soda bread. Unfortunately, when I tested my recipe for the bread, it didn't come out quite the way I had figured. It was fragrant and had a beautiful color. There it sat on my cooling rack, looking like something ready for Food Network. Seriously, this was a lovely loaf of bread. Lovingly, I brushed the crust with margarine while it was still warm. Later, I realized how fortunate it was I hadn't forgotten that step.
You see, when it came time to slice that bread, it showed itself to be, er, very FIRM. Had it not been for the margarine I brushed over it, I'd probably have ruined my bread knife on it. I briefly considered borrowing a band saw because I figured if I could just get it sliced it would probably make very good emergency roofing material.
Undaunted, I reminded myself that I am a Food Brave, creative cook and turned to my fridge and pantry for something else to try. I found some really lovely Bing cherries and a nice lime in the fridge and some almonds on the pantry shelf. I was in business! Cherry-lime chutney was born! Here's how it goes.
For about one cup of chutney, you'll need:
· Fresh cherries - pitted and diced large. About 2/3 of a cup.
· The zest of ¼ - ½ of a lime
· 1 lime, peeled and chopped into pieces
· 1 T chopped almonds, blanched and unsalted
· 1 T sugar
· 10 – 12 mint leaves, minced but not too fine
I cut the cherries into quarters and then cut the quarters into thirds. These were really big cherries so you may want to do yours differently. You’re looking for pieces that are about ¼”.
I zested (lightly rubbed it over a fine grater to remove just the colored bit of the rind) about one quarter to one half of my lime and added that to the cherries. Then, I peeled the lime. I chose to do this with a knife and then, I cut out the sections of the lime from between the whitish skin segments. Personally, that whitish skin is flavor and texture I don’t mind sacrificing. However, if you don’t mind it, you can just peel the lime in the usual way, separate the sections and cut them up. The pieces should be about the same size as your cherries pieces. Add them to the bowl with your cherries and your zest. If there is any lime juice hanging around on your cutting board, get that into the bowl.
· Fresh cherries - pitted and diced large. About 2/3 of a cup.
· The zest of ¼ - ½ of a lime
· 1 lime, peeled and chopped into pieces
· 1 T chopped almonds, blanched and unsalted
· 1 T sugar
· 10 – 12 mint leaves, minced but not too fine
I cut the cherries into quarters and then cut the quarters into thirds. These were really big cherries so you may want to do yours differently. You’re looking for pieces that are about ¼”.
I zested (lightly rubbed it over a fine grater to remove just the colored bit of the rind) about one quarter to one half of my lime and added that to the cherries. Then, I peeled the lime. I chose to do this with a knife and then, I cut out the sections of the lime from between the whitish skin segments. Personally, that whitish skin is flavor and texture I don’t mind sacrificing. However, if you don’t mind it, you can just peel the lime in the usual way, separate the sections and cut them up. The pieces should be about the same size as your cherries pieces. Add them to the bowl with your cherries and your zest. If there is any lime juice hanging around on your cutting board, get that into the bowl.
Add the almonds and sugar and give it all a good stir. Then, roughly mince the mint leaves (make sure you rinse them clean and pat them dry in a paper towel first) and toss them in, as well.
There! All done. The flavor will be much better if this is covered and allowed to sit in the refrigerator for at least an hour before eating. This chutney is really good with chicken or on a croissant or bisquit.
As always, there are substitutions you can make. If limes are a problem for you or just don’t float your boat, try lemon or grapefruit. Orange is a bit sweeter so if you choose orange, cut back your sugar to ½ - ¾ T. The almonds are optional. You can leave them out or substitute some other nut or seed. Unsalted sunflower seeds would be nice. Do opt for unsalted nuts or seeds, whatever you choose. This recipe can be done with other fruits, too. Choose one that is sweet and tends to be juicy.
As you can see, this recipe isn’t exactly friendly to people needing to avoid sugars. The cherries are pretty sugary in themselves and I’ve added sugar to help draw out the juices. You can try leaving out the sugar which will help. However, do be aware of and follow your doctor’s instructions regarding fruit sugars if you are diabetic.
As for the soda bread, never fear. I think I know which of my alterations to the recipe caused the problem. I'll have another whack at it and when I get it the way I want it, I'll make sure to pass the recipe on to you.
So, until then, let's go eat that!
Monday, July 7, 2008
Allergies Versus Sensitivities and Reading Labels
I hope all of you had a great weekend. For those of you in the U.S., I hope your holiday was a good one. We're all relaxed, refreshed and ready for our weekly routines, right? Um, sure. Well, ready or not, let's go.
So far, I’ve approached food as if we’ve all already identified our allergies, sensitivities and we’ve been advised as to particular dietary needs. However, I have had a few friends ask me about the differences between allergies and sensitivities and what a person should do if they suspect an allergy but don’t know for certain. I’ll address the second part of this question first. Those of you with other types of dietary needs, please bear with me for today while we talk about allergies a bit.
TALK TO YOUR DOCTOR.
It’s important. If you suspect a food allergy, it is important to get your advice from a qualified health professional. Allergies can be mild and easily managed or they can be severe and deadly. Dangerous anaphylaxis can result from ingesting a food to which you are severely allergic. Thankfully, this is not a common reaction but that doesn’t mean you need to take that risk. Get proper medical evaluation of your situation and follow the advice and instructions your doctor gives you.
Having said that, let’s look at the first part of a question. What is the difference between an allergy and a sensitivity? Briefly, an allergy results in an immune response in which your body produces an excess of immunoglobulin E as a reaction to the presence of something (in this case, a particular food) that would otherwise be benign. In other words, your immune system identifies the food as a dangerous foreign substance instead of nourishment and launches a major and, for you, uncomfortable defense. The excessive reaction is what gives you the hives, swelling, itching and swelling. The swelling can sometimes become quite dangerous, especially if it occurs around the the mouth and nose or in the throat.
A sensitivity may have similar symptoms to a mild allergic reaction but isn’t really an immune response. When you eat something that ‘doesn’t seem to agree with you’, you’ve experienced a sensitivity. This can be quite uncomfortable but not on the same level as an allergy. Have a look at this article (http://www.webmd.com/allergies/guide/food-allergy-intolerances) I found at WebMd online. Again, this DOES NOT replace a visit to your doctor! It does, however, give you a pretty good idea of the difference between allergies and sensitivities and some of the ways in which your doctor may evaluate your situation.
As you probably noticed in the title of this entry, I also wanted to talk a bit about reading labels. I realize this seems like a forehead-slapping subject. I can hear some of you now. “Well, duh. Of course we read labels. What do you take us for? Sheesh.” Well, as simplistic as it seems, I do think it is worth addressing given the number of allergens that can hide in the most unlikely foods. I’ll use one of my allergies as an example.
As I have mentioned before, I am allergic to yeast, both brewer’s and baker’s. The obvious things to avoid, then, are baked goods that rely on yeast to rise. Simple, yeah? Well, not so simple, really. Yes, I do avoid bread and many other baked goods (I admit I sometimes mourn my donut-less existence but since I’ve found a solution that I will mention before I close this entry, I’ll muddle through, somehow). The thing that really surprised me was the myriad of foods that use yeast as a flavoring. Would you expect to find yeast or yeast extract in a can of beef broth? I didn’t but there it was. I was beyond surprised to find the package of bologna which listed yeast as an ingredient. Light, fluffy bologna? Nope, but it’s still in there. So, it is really terribly important that you read the labels on ALL the foods you buy.
Most ingredients lists include a line at the bottom which highlights the presence of known, common allergens. This can be very helpful but, don’t rely on that. If you have any allergies or sensitivities that are less common, your particular Waterloo may still be there, even though it isn’t listed in that special allergen warning.
Of course, there's more to it. Even after you’ve ascertained which foods and brands work with your dietary needs, you can’t just forget about it. Recipes used to prepare these foods can and do change. Remember to check those labels. Most of the time, you’ll be okay but checking only takes a moment and can save you a lot of trouble later.
As often as possible, I'll offer alterantive ingredients for all of the recipes I post so as to accommodate a variety of dietary needs. Unfortunately, there will be some recipes that simply won't work for certain needs. However, I'll do my best to keep a variety of recipes so no one is entirely left out.
Now, to close this entry on a positive note, let me tell you about my alternative donuts. Here’s what you’ll need:
1 tube of refrigerated, ready-to-bake biscuits (check that label! These often contain diary and nearly always contain soy)
Powdered sugar
Skillet (at least 12”)
Canola or other vegetable oil (I DON’T recommend olive oil this time), enough to fill skillet about ¾ “ deep
Thimble or small melon-baller
Get your skillet and oil ready on medium heat (you’ll probably have to adjust this as you go but this is a good place to start).
Separate the biscuits and make a hole in the center with the thimble or melon-baller. Save your ‘donut holes’ to cook with the donuts.
CAREFULLY place the donuts and holes, a few at a time, into the hot oil. Don’t overload your skillet as this will drop the temperature of the oil and cause the donuts to be oily. Also, you want plenty of room to flip your donuts without risking splashing that hot oil around.
When the donuts are golden, flip with a fork and allow the other side to cook. This can happen very quickly so DON’T leave these.
When fully cooked, remove the donuts to a rack or plate lined with paper towel and sprinkle with powdered sugar. Let them cool a bit and eat warm. These are still quite nice at room temperature but I think they have a nicer flavor while warm. You can mix up a glaze or frosting with powdered sugar and milk (or diary substitute), as well.
These donuts are a great to make with kids because they are quick and the kids can handle the thimble to make the holes and the powdered sugar or glaze. Children SHOULD NOT handle the skillet full of hot oil, however. Please take over the cooking process, yourself.
I think that’s all for today so, until next time, let’s go eat that!
So far, I’ve approached food as if we’ve all already identified our allergies, sensitivities and we’ve been advised as to particular dietary needs. However, I have had a few friends ask me about the differences between allergies and sensitivities and what a person should do if they suspect an allergy but don’t know for certain. I’ll address the second part of this question first. Those of you with other types of dietary needs, please bear with me for today while we talk about allergies a bit.
TALK TO YOUR DOCTOR.
It’s important. If you suspect a food allergy, it is important to get your advice from a qualified health professional. Allergies can be mild and easily managed or they can be severe and deadly. Dangerous anaphylaxis can result from ingesting a food to which you are severely allergic. Thankfully, this is not a common reaction but that doesn’t mean you need to take that risk. Get proper medical evaluation of your situation and follow the advice and instructions your doctor gives you.
Having said that, let’s look at the first part of a question. What is the difference between an allergy and a sensitivity? Briefly, an allergy results in an immune response in which your body produces an excess of immunoglobulin E as a reaction to the presence of something (in this case, a particular food) that would otherwise be benign. In other words, your immune system identifies the food as a dangerous foreign substance instead of nourishment and launches a major and, for you, uncomfortable defense. The excessive reaction is what gives you the hives, swelling, itching and swelling. The swelling can sometimes become quite dangerous, especially if it occurs around the the mouth and nose or in the throat.
A sensitivity may have similar symptoms to a mild allergic reaction but isn’t really an immune response. When you eat something that ‘doesn’t seem to agree with you’, you’ve experienced a sensitivity. This can be quite uncomfortable but not on the same level as an allergy. Have a look at this article (http://www.webmd.com/allergies/guide/food-allergy-intolerances) I found at WebMd online. Again, this DOES NOT replace a visit to your doctor! It does, however, give you a pretty good idea of the difference between allergies and sensitivities and some of the ways in which your doctor may evaluate your situation.
As you probably noticed in the title of this entry, I also wanted to talk a bit about reading labels. I realize this seems like a forehead-slapping subject. I can hear some of you now. “Well, duh. Of course we read labels. What do you take us for? Sheesh.” Well, as simplistic as it seems, I do think it is worth addressing given the number of allergens that can hide in the most unlikely foods. I’ll use one of my allergies as an example.
As I have mentioned before, I am allergic to yeast, both brewer’s and baker’s. The obvious things to avoid, then, are baked goods that rely on yeast to rise. Simple, yeah? Well, not so simple, really. Yes, I do avoid bread and many other baked goods (I admit I sometimes mourn my donut-less existence but since I’ve found a solution that I will mention before I close this entry, I’ll muddle through, somehow). The thing that really surprised me was the myriad of foods that use yeast as a flavoring. Would you expect to find yeast or yeast extract in a can of beef broth? I didn’t but there it was. I was beyond surprised to find the package of bologna which listed yeast as an ingredient. Light, fluffy bologna? Nope, but it’s still in there. So, it is really terribly important that you read the labels on ALL the foods you buy.
Most ingredients lists include a line at the bottom which highlights the presence of known, common allergens. This can be very helpful but, don’t rely on that. If you have any allergies or sensitivities that are less common, your particular Waterloo may still be there, even though it isn’t listed in that special allergen warning.
Of course, there's more to it. Even after you’ve ascertained which foods and brands work with your dietary needs, you can’t just forget about it. Recipes used to prepare these foods can and do change. Remember to check those labels. Most of the time, you’ll be okay but checking only takes a moment and can save you a lot of trouble later.
As often as possible, I'll offer alterantive ingredients for all of the recipes I post so as to accommodate a variety of dietary needs. Unfortunately, there will be some recipes that simply won't work for certain needs. However, I'll do my best to keep a variety of recipes so no one is entirely left out.
Now, to close this entry on a positive note, let me tell you about my alternative donuts. Here’s what you’ll need:
1 tube of refrigerated, ready-to-bake biscuits (check that label! These often contain diary and nearly always contain soy)
Powdered sugar
Skillet (at least 12”)
Canola or other vegetable oil (I DON’T recommend olive oil this time), enough to fill skillet about ¾ “ deep
Thimble or small melon-baller
Get your skillet and oil ready on medium heat (you’ll probably have to adjust this as you go but this is a good place to start).
Separate the biscuits and make a hole in the center with the thimble or melon-baller. Save your ‘donut holes’ to cook with the donuts.
CAREFULLY place the donuts and holes, a few at a time, into the hot oil. Don’t overload your skillet as this will drop the temperature of the oil and cause the donuts to be oily. Also, you want plenty of room to flip your donuts without risking splashing that hot oil around.
When the donuts are golden, flip with a fork and allow the other side to cook. This can happen very quickly so DON’T leave these.
When fully cooked, remove the donuts to a rack or plate lined with paper towel and sprinkle with powdered sugar. Let them cool a bit and eat warm. These are still quite nice at room temperature but I think they have a nicer flavor while warm. You can mix up a glaze or frosting with powdered sugar and milk (or diary substitute), as well.
These donuts are a great to make with kids because they are quick and the kids can handle the thimble to make the holes and the powdered sugar or glaze. Children SHOULD NOT handle the skillet full of hot oil, however. Please take over the cooking process, yourself.
I think that’s all for today so, until next time, let’s go eat that!
Wednesday, July 2, 2008
Cool Mint Smoothie (dairy and non-dairy)

We’re coming up on July 4th and everyone is looking for some new recipe to show off to friends and family. Of course, if the recipe doesn’t require cooking, that’s a big bonus because it is just too hot to deal with hot ovens and so forth, right? Goodness knows, I’m a big fan of cold dishes this time of year. After all, today’s forecast high for my neck of the woods is 113 degrees F. Yikes!
Fortunately, I’ve come up with a very cooling, satisfying mint smoothie for a day just like this. It’s simple, goes together in minutes and feels WONDERFUL on a hot day. Want to try it? Here’s what you’ll need:
Fortunately, I’ve come up with a very cooling, satisfying mint smoothie for a day just like this. It’s simple, goes together in minutes and feels WONDERFUL on a hot day. Want to try it? Here’s what you’ll need:
Just a quick note - I used soy products here but if dairy is okay for you, simply use regular vanilla yogurt and lowfat milk.
· 1 cup plain soy milk
· 1 cup plain soy milk
· 1 6 oz. container of vanilla soy yogurt
· 4 T honey
· 1 tsp vanilla
· 1 tsp peppermint or spearmint extract
· 6 (or more if you desire) fresh mint leaves – optional
· 1 – 1 ½ cups ice cubes
Wash the mint leaves and pat them dry. Mince fine. Add all ingredients to your blender, beginning with liquid ingredients first and adding the ice last. Puree until ice is entirely crushed. Serve with a mint sprig for garnish.
· 4 T honey
· 1 tsp vanilla
· 1 tsp peppermint or spearmint extract
· 6 (or more if you desire) fresh mint leaves – optional
· 1 – 1 ½ cups ice cubes
Wash the mint leaves and pat them dry. Mince fine. Add all ingredients to your blender, beginning with liquid ingredients first and adding the ice last. Puree until ice is entirely crushed. Serve with a mint sprig for garnish.
This makes two rather large smoothies or four small ones. The mint is particularly refreshing on a hot day and the sugar is kept to a minimum. However, if you’re needing to avoid the sugar, use sugar-free yogurt and a sugar substitute in place of the honey. Yes, the flavor will be slightly different but that’s not really a bad thing, just different. No big deal.
"Hey, I Can Eat That" will be on a brief break for the long weekend but I'll see you all back here on Monday, July 7th. Until then, have fun, eat well, keep cool and let’s go eat that!
Monday, June 30, 2008
Citrus Roasted Chicken
Now that we’ve talked about all the amazing things about olive oil, I’m going to give you a recipe that doesn’t use any! Ironic, no? Okay, you will use a bit if you are using a regular oven rather than a slow cooker.
Today, I’m going to give you a recipe for really, really tender, juicy roasted chicken that will be full of flavor without requiring a trip to a gourmet shop and hours and hours of prep time. Here’s what you’ll need:
· 1 whole chicken – I usually go for the biggest available because I like the leftovers.
· 1 onion – Sweet onion, if you can get it. If not, white or yellow will do just fine.
· 1 large navel orange (you can choose another citrus and we'll talk about that in a moment)
· Several stems of fresh sage and rosemary if you can get them. This is optional so don’t make yourself nuts trying to find it. Some grocery stores have fresh herbs and some don’t.
· ¼ - ½ cup apple cider vinegar (if you don’t have any, regular cider vinegar or rice vinegar will do but I think the flavor of the apple cider vinegar is worth having)
· ¼ cup olive oil (if you are cooking in a regular oven)
· 2 or 3 garlic cloves, minced (if you like it more garlicky, go for four or five cloves and stay with two or three for a milder flavor)
· 1 – 1 ½ tsp celery seed
· Salt and pepper to taste
If you’re using a regular oven, pre-heat to 350 degrees. I have a slow cooker with a programmable meat thermometer built in. It’s very handy and allows me to start dinner and go away to do other things. If that is an option for you, I strongly recommend it. However, it is not necessary. We’ll carry on as if we’re all cooking in a standard oven.
Use a baking dish or roasting pan deep enough to really hold your chicken and as much as three cups of liquid without being in danger of spilling over. You’ll have to handle the pan a bit and you don’t want to risk injuries. You can use the roasting bags to eliminate the need for basting and to make clean up easier. Of course, this does increase plastic waste, so you’ll want to bear that in mind. I admit, I do use them for roasting the turkey at Thanksgiving, but the rest of the time, I go ahead and baste.
Remove the neck and any organs from the cavity of the chicken. If you are so inclined, the neck and the rack (the bones) of the chicken can be used later for making soup stock. My husband likes me to save the liver because he does love chicken liver fried in butter. That one liver is enough for him to enjoy the flavor without eating all the fat and calories usually involved in eating organ meat. It works out fine because, goodness knows, he never gets any competition from me or our son when it comes time to eat it.
Er, anyway…
Rinsing the chicken is optional, in my opinion. Mostly, I find it makes more mess in the kitchen than anything else and results in a large-scale disinfecting project once I get the bird in the oven. Unless the bird seems really messy, I’d just go ahead and prepare it for cooking. Once it’s in the pan, fold the wings back so the tips will stay under the bird.
Peel, wash and quarter the onion and the orange. Juice the orange into a measuring cup and set the juice aside. DON’T throw out the orange quarters. Rinse the sage and rosemary stems. You need 3 or 4 of each.
Add the reserved orange juice to the apple cider vinegar, garlic, celery seed and half the olive oil (if you’re using the oven – omit the oil if you are using a slow cooker). Separate the skin from the breast of the chicken. To do this, start at the cavity. Make a small slit in the skin if you need to, then push your hand in between the skin and the flesh. It should separate all the way along the breast on each side of the breastbone. You also need to make a couple TINY slits in the skin of the drumsticks and thighs so you can separate the skin from the flesh as well as you can. This won’t work as well but it will be enough.
Stuff the cavity of the chicken with the onion (you may not get it all in there but you need at least half), at least two orange quarters and the sage and rosemary.
Rub the remaining olive oil (again, only if you are using a regular oven) all over the skin of the chicken.
Pour some of the juice mixture under the skin in all the places where you separated it from the flesh. Use it all.
Lightly shake salt and pepper over all and put your chicken in the oven.
This should cook until the internal temperature at the breast is 185 – 187 degrees. It will carry over cook to 190 after it is removed from the oven. If you are not using a roasting bag, you should baste with the pan juices about every 20 minutes. Depending on the size of the chicken, this could take about an hour and a half.
As always, you can change out ingredients. Lemon is a wonderful substitute for the orange. If onion is not in your game plan, try some celery, carrots and extra rosemary. Lime is a great citrus for this, but skip the sage and rosemary and go for cilantro and some mild peppers. I haven't tried grapefruit, but it might be very nice in this if you add some crushed mint leaves to the juice and vinegar mixture and put a few sprigs of mint in the cavity with the rosemary. I think I'd skip the sage on that one. If anyone tries that combination, let us know how it turned out!
This is terrific as leftovers. Sandwiches and chicken salads are great made from this. You can also use it as a pizza topping or in the alternative egg rolls we talked about before.
The biggest time investment here is the cooking. Preparation is simple. If you can get a good slow cooker, preferably with some sort of meat thermometer, this can be put together before you head out for the day and you’ll be greeted with a GREAT smelling meal when you get home.
I think that about covers it. So, until next time, let’s go eat that!
Today, I’m going to give you a recipe for really, really tender, juicy roasted chicken that will be full of flavor without requiring a trip to a gourmet shop and hours and hours of prep time. Here’s what you’ll need:
· 1 whole chicken – I usually go for the biggest available because I like the leftovers.
· 1 onion – Sweet onion, if you can get it. If not, white or yellow will do just fine.
· 1 large navel orange (you can choose another citrus and we'll talk about that in a moment)
· Several stems of fresh sage and rosemary if you can get them. This is optional so don’t make yourself nuts trying to find it. Some grocery stores have fresh herbs and some don’t.
· ¼ - ½ cup apple cider vinegar (if you don’t have any, regular cider vinegar or rice vinegar will do but I think the flavor of the apple cider vinegar is worth having)
· ¼ cup olive oil (if you are cooking in a regular oven)
· 2 or 3 garlic cloves, minced (if you like it more garlicky, go for four or five cloves and stay with two or three for a milder flavor)
· 1 – 1 ½ tsp celery seed
· Salt and pepper to taste
If you’re using a regular oven, pre-heat to 350 degrees. I have a slow cooker with a programmable meat thermometer built in. It’s very handy and allows me to start dinner and go away to do other things. If that is an option for you, I strongly recommend it. However, it is not necessary. We’ll carry on as if we’re all cooking in a standard oven.
Use a baking dish or roasting pan deep enough to really hold your chicken and as much as three cups of liquid without being in danger of spilling over. You’ll have to handle the pan a bit and you don’t want to risk injuries. You can use the roasting bags to eliminate the need for basting and to make clean up easier. Of course, this does increase plastic waste, so you’ll want to bear that in mind. I admit, I do use them for roasting the turkey at Thanksgiving, but the rest of the time, I go ahead and baste.
Remove the neck and any organs from the cavity of the chicken. If you are so inclined, the neck and the rack (the bones) of the chicken can be used later for making soup stock. My husband likes me to save the liver because he does love chicken liver fried in butter. That one liver is enough for him to enjoy the flavor without eating all the fat and calories usually involved in eating organ meat. It works out fine because, goodness knows, he never gets any competition from me or our son when it comes time to eat it.
Er, anyway…
Rinsing the chicken is optional, in my opinion. Mostly, I find it makes more mess in the kitchen than anything else and results in a large-scale disinfecting project once I get the bird in the oven. Unless the bird seems really messy, I’d just go ahead and prepare it for cooking. Once it’s in the pan, fold the wings back so the tips will stay under the bird.
Peel, wash and quarter the onion and the orange. Juice the orange into a measuring cup and set the juice aside. DON’T throw out the orange quarters. Rinse the sage and rosemary stems. You need 3 or 4 of each.
Add the reserved orange juice to the apple cider vinegar, garlic, celery seed and half the olive oil (if you’re using the oven – omit the oil if you are using a slow cooker). Separate the skin from the breast of the chicken. To do this, start at the cavity. Make a small slit in the skin if you need to, then push your hand in between the skin and the flesh. It should separate all the way along the breast on each side of the breastbone. You also need to make a couple TINY slits in the skin of the drumsticks and thighs so you can separate the skin from the flesh as well as you can. This won’t work as well but it will be enough.
Stuff the cavity of the chicken with the onion (you may not get it all in there but you need at least half), at least two orange quarters and the sage and rosemary.
Rub the remaining olive oil (again, only if you are using a regular oven) all over the skin of the chicken.
Pour some of the juice mixture under the skin in all the places where you separated it from the flesh. Use it all.
Lightly shake salt and pepper over all and put your chicken in the oven.
This should cook until the internal temperature at the breast is 185 – 187 degrees. It will carry over cook to 190 after it is removed from the oven. If you are not using a roasting bag, you should baste with the pan juices about every 20 minutes. Depending on the size of the chicken, this could take about an hour and a half.
As always, you can change out ingredients. Lemon is a wonderful substitute for the orange. If onion is not in your game plan, try some celery, carrots and extra rosemary. Lime is a great citrus for this, but skip the sage and rosemary and go for cilantro and some mild peppers. I haven't tried grapefruit, but it might be very nice in this if you add some crushed mint leaves to the juice and vinegar mixture and put a few sprigs of mint in the cavity with the rosemary. I think I'd skip the sage on that one. If anyone tries that combination, let us know how it turned out!
This is terrific as leftovers. Sandwiches and chicken salads are great made from this. You can also use it as a pizza topping or in the alternative egg rolls we talked about before.
The biggest time investment here is the cooking. Preparation is simple. If you can get a good slow cooker, preferably with some sort of meat thermometer, this can be put together before you head out for the day and you’ll be greeted with a GREAT smelling meal when you get home.
I think that about covers it. So, until next time, let’s go eat that!
Friday, June 27, 2008
Why Use Olive Oil?
While you stuffed on the alternative egg rolls, did you stop to wonder why I told you to use extra virgin olive oil instead of peanut or canola or plain ol’ vegetable oil? Did you go ahead and use one of those oils anyway? No need to hide. I won't be sending the Oil Police to your home to confiscate your oils and levy fines for your unauthorized oil activities. In terms of cooking the egg rolls, the only difference is the taste. But I think that’s a big consideration and there are other important considerations when choosing a cooking oil.
So, why did I use olive oil?
There’s been a lot of buzz about olive oil, particularly extra virgin olive oil, lately. Many are touting the health benefits of the Mediteranean Diet which is rich in olive oil. Others are singing the praises of the miraculous polyphenols which are found in higher quantities in extra virgin olive oil. Polyphenols are natural antioxidants and thought to help guard against degenerative diseases, heart problems, and general aging. Since olive oil is a monounsaturated fat, it is considered a healthy fat that can help reduce LDL cholesterol in the blood (for that info, have a look here http://health.yahoo.com/experts/weightkoch/17461/the-benefits-of-extra-virgin-olive-oil/). I even read one article from the BBC that talked about research that suggests there might be an anti-inflammatory property to olive oil (I’m not making this up, I swear. http://news.bbc.co.uk/2/hi/health/4204076.stm).
These are all good reasons to use it, don’t you think? But let’s get back to that first important reason I mentioned. Taste.
Extra virgin olive oil has a distinct flavor. Granted, it isn’t always the flavor you want in your food so there are times when it is definitely not the appropriate choice for cooking. I once sampled some gourmet potato chips that had been fried in olive oil. I was excited about these because I like olive oil, I like potato chips and I like the idea of anything that will make potato chips at least sound healthy. The reality was not so exciting. These chips (and no, I don’t remember the brand) were rather heavy and tasted more strongly of oil than I really cared for. I’ve since fried up my own version at home in olive oil with better success but we’ll talk about that more in a moment. Also, that distinctive olive flavor may not really be a good choice for something as delicate, say, as an omelet. To some degree, you’ll have to experiment and find out what tastes good to you and what doesn’t. However, you should always remember that olive oil is still a fat and use it accordingly.
As I said with regard to using whole grains, when cooking for special dietary needs we have to make the most of the foods we can have. We need to go after the most flavor and nutrition possible. In other words, we can’t just settle for ‘okay’ food. Limited food choices shouldn’t mean limited flavor and benefits. So, choose every ingredient carefully, even your cooking oil.
Oh yeah. And if you’re allergic to olives, please disregard this entire thing. *waves cheerfully*
And I haven’t forgotten about those potato chips fried in olive oil. Here’s what I did:
First, I washed and sliced (nice and thin) a medium potato. I like to leave the peel on rather than lose that texture and the nutrients by peeling. If you don’t care for the peel, take it right off. No big deal. Then, I lightly salted the slices with celery salt. You can use plain salt or any other flavored salt you like. I heated a larger skillet (at least 12”) and coated the bottom heavily with olive oil. It wasn’t deep enough to measure but it wasn’t a light layer, either. When the oil was hot, I carefully laid the slices of potato in a single layer in the pan. Don’t leave these to do something else because they will burn and you’ll have an awful mess to clean up. Not to mention, you won’t have any potato chips to snack on and that would just be tragic. Once they were browned on one side, I flipped them (a fork will do for this) and browned the other side. This goes really quickly which is good because they smell great. Remove the chips from the pan to a plate lined with paper towel. Let them cool only enough to keep from burning your tongue to a cinder. These are best warm. If you don’t eat them all, you can save them and reheat as leftovers. This, however, is a completely foreign idea to me and I don’t believe you’ll ever have leftovers. You can certainly do this same thing with yams, by the way.
I have also done this after cooking meat in the skillet. Instead of deglazing the pan (getting all those good bits of flavor stuck to the bottom by using some sort of cooking liquid), I toss in my sliced potato. It might need a bit more oil added. The potatoes will take on some of those wonderful flavors left behind after you cooked your meat and you haven’t dirtied up another pan. Two plusses, as far as I can see!
Enjoy and until next time, let’s go eat that!
So, why did I use olive oil?
There’s been a lot of buzz about olive oil, particularly extra virgin olive oil, lately. Many are touting the health benefits of the Mediteranean Diet which is rich in olive oil. Others are singing the praises of the miraculous polyphenols which are found in higher quantities in extra virgin olive oil. Polyphenols are natural antioxidants and thought to help guard against degenerative diseases, heart problems, and general aging. Since olive oil is a monounsaturated fat, it is considered a healthy fat that can help reduce LDL cholesterol in the blood (for that info, have a look here http://health.yahoo.com/experts/weightkoch/17461/the-benefits-of-extra-virgin-olive-oil/). I even read one article from the BBC that talked about research that suggests there might be an anti-inflammatory property to olive oil (I’m not making this up, I swear. http://news.bbc.co.uk/2/hi/health/4204076.stm).
These are all good reasons to use it, don’t you think? But let’s get back to that first important reason I mentioned. Taste.
Extra virgin olive oil has a distinct flavor. Granted, it isn’t always the flavor you want in your food so there are times when it is definitely not the appropriate choice for cooking. I once sampled some gourmet potato chips that had been fried in olive oil. I was excited about these because I like olive oil, I like potato chips and I like the idea of anything that will make potato chips at least sound healthy. The reality was not so exciting. These chips (and no, I don’t remember the brand) were rather heavy and tasted more strongly of oil than I really cared for. I’ve since fried up my own version at home in olive oil with better success but we’ll talk about that more in a moment. Also, that distinctive olive flavor may not really be a good choice for something as delicate, say, as an omelet. To some degree, you’ll have to experiment and find out what tastes good to you and what doesn’t. However, you should always remember that olive oil is still a fat and use it accordingly.
As I said with regard to using whole grains, when cooking for special dietary needs we have to make the most of the foods we can have. We need to go after the most flavor and nutrition possible. In other words, we can’t just settle for ‘okay’ food. Limited food choices shouldn’t mean limited flavor and benefits. So, choose every ingredient carefully, even your cooking oil.
Oh yeah. And if you’re allergic to olives, please disregard this entire thing. *waves cheerfully*
And I haven’t forgotten about those potato chips fried in olive oil. Here’s what I did:
First, I washed and sliced (nice and thin) a medium potato. I like to leave the peel on rather than lose that texture and the nutrients by peeling. If you don’t care for the peel, take it right off. No big deal. Then, I lightly salted the slices with celery salt. You can use plain salt or any other flavored salt you like. I heated a larger skillet (at least 12”) and coated the bottom heavily with olive oil. It wasn’t deep enough to measure but it wasn’t a light layer, either. When the oil was hot, I carefully laid the slices of potato in a single layer in the pan. Don’t leave these to do something else because they will burn and you’ll have an awful mess to clean up. Not to mention, you won’t have any potato chips to snack on and that would just be tragic. Once they were browned on one side, I flipped them (a fork will do for this) and browned the other side. This goes really quickly which is good because they smell great. Remove the chips from the pan to a plate lined with paper towel. Let them cool only enough to keep from burning your tongue to a cinder. These are best warm. If you don’t eat them all, you can save them and reheat as leftovers. This, however, is a completely foreign idea to me and I don’t believe you’ll ever have leftovers. You can certainly do this same thing with yams, by the way.
I have also done this after cooking meat in the skillet. Instead of deglazing the pan (getting all those good bits of flavor stuck to the bottom by using some sort of cooking liquid), I toss in my sliced potato. It might need a bit more oil added. The potatoes will take on some of those wonderful flavors left behind after you cooked your meat and you haven’t dirtied up another pan. Two plusses, as far as I can see!
Enjoy and until next time, let’s go eat that!
Wednesday, June 25, 2008
Alternative Egg Rolls
Welcome back! Since I didn’t give you a recipe at all last time and instead, made you go grocery shopping, I’ll make it up to you today. I’ll give you one of my favorite recipes along with some suggestions for mixing it up a bit.
Do you like egg rolls? I really do. However, unless the chef is willing to share his secrets with me, I really shouldn’t eat them at a restaurant. Instead, I’ve figured out a quick and simple way of making up an alternative that is full of great flavor. Here’s what you’ll need:
· Skillet – 12” or larger
· One cooked, boneless, skinless chicken breast
· One cup cooked brown rice (cook according to package directions)
· One cup shredded cabbage – red or green or a combination (which is pretty)
· 3 or 4 T rice vinegar (I like garlic infused)
· One package of egg roll wrappers
· Extra virgin olive oil (enough to fill your skillet about ½ - ¾ “ deep
· Optional ingredients: cooked seafood or firm fish of your choice, shredded carrot (about ¼ cup), minced celery, 2 or 3 green onions sliced fine
Dice the chicken breast (or seafood or fish of your choice) into ½ “ pieces. In a medium sized mixing bowl, combine chicken, brown rice, cabbage (and carrot, celery and onion, if you choose) and toss all with rice vinegar.
NOTE: You can stop right here. Dinner’s ready if you’d like a chicken salad with a twist. This is a REALLY BIG meal for one or a great main dish for two with some nice fresh fruit on the side. Or, you can carry on and have the mocked-up egg rolls. Want to go on? Okay, let’s!
Heat the skillet with the olive oil while you prepare the egg rolls. I suggest heating on medium since olive oil will smoke if too hot. Smells weird, tastes a little off and your rolls will get too brown too quickly. All around, not a good thing.
Lay an egg roll wrapper flat and place roughly 2 T of the chicken and cabbage mixture in the center. Arrange it in sort of a rectangle. Fold the wrapper like a burrito. That is, fold the ends in and then roll it up. You can lightly seal it with a bit of water but don’t expect it to hold together really well. This will take some careful handling. Go ahead and prepare several of these rolls. You can use all of your chicken mixture or you can make half into rolls and put the other half away for a nice chicken salad lunch tomorrow.
CAREFULLY place the rolls, seam down, in the skillet. Be sure to leave plenty or room between the rolls. You might have to do them a few at a time. Flip the rolls when the wrapper has cooked to a golden color. Watch carefully because this doesn’t take long! Remove the rolls from the oil to a rack or plate covered with paper towel to absorb extra oil.
This will make 8 – 12 rolls, depending on how much you fill the wrappers. You can make only as many as you want right now and save the rest of the mixture for tomorrow, either to make more rolls or to eat as salad.
Personally, I like this mixture so much as a salad, I rarely get as far as making the rolls. But when I do, I’m always glad I was patient enough to do it. They are very satisfyingly crunchy as well as VERY filling! You won’t fool anyone into thinking you’ve hidden Chef Morimoto in your kitchen, but these rolls are simple and tasty and can be thrown together very easily some evening after work since the meat and rice can be cooked ahead. Most often, I pick up one of those rotisserie chickens from my local grocery store deli. As always, be sure to know what ingredients are in the deli’s seasoning mixture, just to be on the safe side. When in doubt, cook it yourself. In a pinch, you can use the canned chicken breast.
You’ll notice I had you use brown rice for this. As we talked about last time, using the whole grain option adds another layer of flavor and even texture to your dishes. Brown rice is as readily available as white and takes no more effort to cook. It’s a simple adjustment and you’ll be very glad you tried it.
Hope you enjoy this and until next time, let’s go eat that!
Do you like egg rolls? I really do. However, unless the chef is willing to share his secrets with me, I really shouldn’t eat them at a restaurant. Instead, I’ve figured out a quick and simple way of making up an alternative that is full of great flavor. Here’s what you’ll need:
· Skillet – 12” or larger
· One cooked, boneless, skinless chicken breast
· One cup cooked brown rice (cook according to package directions)
· One cup shredded cabbage – red or green or a combination (which is pretty)
· 3 or 4 T rice vinegar (I like garlic infused)
· One package of egg roll wrappers
· Extra virgin olive oil (enough to fill your skillet about ½ - ¾ “ deep
· Optional ingredients: cooked seafood or firm fish of your choice, shredded carrot (about ¼ cup), minced celery, 2 or 3 green onions sliced fine
Dice the chicken breast (or seafood or fish of your choice) into ½ “ pieces. In a medium sized mixing bowl, combine chicken, brown rice, cabbage (and carrot, celery and onion, if you choose) and toss all with rice vinegar.
NOTE: You can stop right here. Dinner’s ready if you’d like a chicken salad with a twist. This is a REALLY BIG meal for one or a great main dish for two with some nice fresh fruit on the side. Or, you can carry on and have the mocked-up egg rolls. Want to go on? Okay, let’s!
Heat the skillet with the olive oil while you prepare the egg rolls. I suggest heating on medium since olive oil will smoke if too hot. Smells weird, tastes a little off and your rolls will get too brown too quickly. All around, not a good thing.
Lay an egg roll wrapper flat and place roughly 2 T of the chicken and cabbage mixture in the center. Arrange it in sort of a rectangle. Fold the wrapper like a burrito. That is, fold the ends in and then roll it up. You can lightly seal it with a bit of water but don’t expect it to hold together really well. This will take some careful handling. Go ahead and prepare several of these rolls. You can use all of your chicken mixture or you can make half into rolls and put the other half away for a nice chicken salad lunch tomorrow.
CAREFULLY place the rolls, seam down, in the skillet. Be sure to leave plenty or room between the rolls. You might have to do them a few at a time. Flip the rolls when the wrapper has cooked to a golden color. Watch carefully because this doesn’t take long! Remove the rolls from the oil to a rack or plate covered with paper towel to absorb extra oil.
This will make 8 – 12 rolls, depending on how much you fill the wrappers. You can make only as many as you want right now and save the rest of the mixture for tomorrow, either to make more rolls or to eat as salad.
Personally, I like this mixture so much as a salad, I rarely get as far as making the rolls. But when I do, I’m always glad I was patient enough to do it. They are very satisfyingly crunchy as well as VERY filling! You won’t fool anyone into thinking you’ve hidden Chef Morimoto in your kitchen, but these rolls are simple and tasty and can be thrown together very easily some evening after work since the meat and rice can be cooked ahead. Most often, I pick up one of those rotisserie chickens from my local grocery store deli. As always, be sure to know what ingredients are in the deli’s seasoning mixture, just to be on the safe side. When in doubt, cook it yourself. In a pinch, you can use the canned chicken breast.
You’ll notice I had you use brown rice for this. As we talked about last time, using the whole grain option adds another layer of flavor and even texture to your dishes. Brown rice is as readily available as white and takes no more effort to cook. It’s a simple adjustment and you’ll be very glad you tried it.
Hope you enjoy this and until next time, let’s go eat that!
Friday, June 20, 2008
Oven-Baked Wheat Germ Chicken
Hi there! I hope you enjoyed your cobbler. I’ve always found it to be a real crowd pleaser. Well, I hope you’re ready for something else to try. How about some baked chicken?
*listens to the crickets chirp*
Alright, yes. It’s a recipe for baked chicken. I know. But hear me, er, read me out before you give up and go take a nap.
On top of my many other allergies, yeast – both baker’s and brewer’s – is on my list of things to avoid. This means I need an alternative to bread crumbs. Depending on what sort of dish I’m fixing, I have a few choices. I can use crushed cereal flakes (wheat for me but if corn is okay for you, good ol’ corn flakes are handy), crushed crackers or wheat germ.
For this recipe, we’ll be using wheat germ. Obviously, if wheat doesn’t work for you, try corn flakes or even low-/no- sodium potato chips (I wouldn’t recommend regular chips as they would be much too salty). Let’s have a look at what you’ll need.
· 9” x 12” baking pan (non-stick is nice but not required)
· 1 – 1 ½ lbs. fresh, boneless, skinless chicken tenders or breasts cut into roughly 1 – 1 ½ ” wide strips
· ¾ - 1 cup wheat germ
· 1 tsp each – celery seed, onion powder, garlic powder (or garlic salt), crushed dried parsley or 2 tsp minced fresh parsley
· Salt and pepper to taste
· 2 tsp extra virgin olive oil if you are not using a non-stick pan
Pre-heat your oven to 375 degrees.
If your baking pan is not non-stick, coat it lightly with the olive oil. Use a paper towel to spread the oil evenly and absorb any extra.
Combine wheat germ and seasonings in a wide, shallow dish or a large plastic bag (preferably one with a zip seal to reduce mess).
Rinse chicken tenders and shake off extra water but do not dry.
Place damp tenders, a few at a time, in the wheat germ mixture. Turn or shake to coat completely.
Place coated chicken in one layer in your pan. It’s okay if the pieces touch.
Bake in a 375 degree oven for 35 -45 minutes or until the internal temperature of the chicken is 185 – 187 degrees. It will “carry-over” cook to 190.
You can certainly change up the seasonings you use to get different flavors and accommodate different needs. You can also choose a ready-made seasoning blend for chicken but be sure to read the ingredients label to assure you aren’t going end up eating something you’d rather not.
You’ll want to make plenty of this chicken as it makes great leftovers. Reheat for another meal, use in a sandwich or dice and serve cold on a bed of salad greens.
This is a simple recipe that even the kids can help make. Shaking a bag full of chicken is really pretty fun. I think you’ll enjoy the nutty flavor of the wheat germ, too.
Until next time, let’s go eat that!
*listens to the crickets chirp*
Alright, yes. It’s a recipe for baked chicken. I know. But hear me, er, read me out before you give up and go take a nap.
On top of my many other allergies, yeast – both baker’s and brewer’s – is on my list of things to avoid. This means I need an alternative to bread crumbs. Depending on what sort of dish I’m fixing, I have a few choices. I can use crushed cereal flakes (wheat for me but if corn is okay for you, good ol’ corn flakes are handy), crushed crackers or wheat germ.
For this recipe, we’ll be using wheat germ. Obviously, if wheat doesn’t work for you, try corn flakes or even low-/no- sodium potato chips (I wouldn’t recommend regular chips as they would be much too salty). Let’s have a look at what you’ll need.
· 9” x 12” baking pan (non-stick is nice but not required)
· 1 – 1 ½ lbs. fresh, boneless, skinless chicken tenders or breasts cut into roughly 1 – 1 ½ ” wide strips
· ¾ - 1 cup wheat germ
· 1 tsp each – celery seed, onion powder, garlic powder (or garlic salt), crushed dried parsley or 2 tsp minced fresh parsley
· Salt and pepper to taste
· 2 tsp extra virgin olive oil if you are not using a non-stick pan
Pre-heat your oven to 375 degrees.
If your baking pan is not non-stick, coat it lightly with the olive oil. Use a paper towel to spread the oil evenly and absorb any extra.
Combine wheat germ and seasonings in a wide, shallow dish or a large plastic bag (preferably one with a zip seal to reduce mess).
Rinse chicken tenders and shake off extra water but do not dry.
Place damp tenders, a few at a time, in the wheat germ mixture. Turn or shake to coat completely.
Place coated chicken in one layer in your pan. It’s okay if the pieces touch.
Bake in a 375 degree oven for 35 -45 minutes or until the internal temperature of the chicken is 185 – 187 degrees. It will “carry-over” cook to 190.
You can certainly change up the seasonings you use to get different flavors and accommodate different needs. You can also choose a ready-made seasoning blend for chicken but be sure to read the ingredients label to assure you aren’t going end up eating something you’d rather not.
You’ll want to make plenty of this chicken as it makes great leftovers. Reheat for another meal, use in a sandwich or dice and serve cold on a bed of salad greens.
This is a simple recipe that even the kids can help make. Shaking a bag full of chicken is really pretty fun. I think you’ll enjoy the nutty flavor of the wheat germ, too.
Until next time, let’s go eat that!
Wednesday, June 18, 2008
Dairy-Free, No Sugar Added, Choose-a-Fruit Cobbler
Hey there, Brave Foodies! Welcome back to “Hey, I Can Eat That.” Tell me, how was the soup?
I spent so much time talking about experimentation last time, I never got around to leaving you a recipe! To make it up to you, I’m not going to yap at you at all today (well, I probably will but I promise I’ll keep it to a minimum). Instead, I’ll jump right in with a recipe for “Dairy-Free, No Sugar Added , Choose-a-Fruit Cobbler.” The preparation time on this varies quite a lot based on what fruit you choose. This is a fairly large cobbler but you can use a single layer cake mix and a 8"x8" or 9"x9" square pan to make a smaller dessert.
Here’s what you’ll need:
*9” x 12” baking pan (non-stick is nice if you have it but not required)
*Sugar-free White or Yellow Cake Mix for a two layer cake – make sure you read the ingredients label since some mixes do include dairy (if you can’t find this or don’t need to avoid sugar, we’ll discuss an alternative as we go. Of course, you can use a regular cake mix if sugar isn't a problem for you.)
*Margarine (I like the soft tub variety. If you can have dairy, you may certainly use butter if you prefer.)
*A few teaspoons artificial sweetener (or sugar if you prefer and it fits in your diet)
*Cinnamon, nutmeg and lemon juice (these are optional)
*Flour (1 or 2 tablespoons)
*Fruit - apples, berries, pears, peaches, any combination you like – enough to cover the bottom of your baking pan 1” deep
Pre-heat your oven to 350 degrees
First of all, choose a fruit. I like apple, peach and cherry, personally. Heck, you don’t even need to have just one. Apples pair very nicely with cherries or blueberries so you could use both. What other fruit combinations do you like? More importantly, what’s in season? We’ll be using a standard 9” x 12” baking dish, so you’ll want enough of whichever fruit you choose to cover the pan about 1” deep. Wash, peel, slice and prepare your fruit as appropriate. Most berries can be used as is. You’ll want to slice strawberries, though. Peeling is optional but I generally do peel my apples, peaches or pears. Not everyone cares for the texture of the peel in their cobbler. Do as you like seeing as you’re the one who gets to eat!
Lightly oil your baking dish with vegetable oil (if you’re soy sensitive, use canola or sunflower). Keep it very light by putting the oil on a paper towel and wiping the pan with the towel. If you’re using a non-stick pan, you can skip this step.
Arrange your fruit in the pan as evenly as possible. I like to have the fruit about an inch deep in the pan. If you put in less fruit, you’ll end up with more cobbler crust than fruit and it will be dry. Too much and the fruit won’t be done and soft before the crust gets too brown. If your fruit seems a bit dry (as in, it wasn’t particularly juicy in preparation), you can add two or three tablespoons of apple juice. Now is the time for some creative sniffing. I like to add cinnamon and/or nutmeg to my cobbler. You can also drizzle a bit of lemon juice to preserve color and add a bit of tartness. Sniff and see what smells good to you. If your fruit is on the tart side, you can even sprinkle a bit of artificial sweetener evenly over the pan. Sprinkle a tablespoon or so of flour evenly over the fruit. Dot the surface of the pan of fruit with small pieces of margarine. By small, I mean roughly 1/2”. Don’t get carried away with this. We’ll be using more on top of the crust so a little at this point will go a long way. The margarine can be pretty widely spaced. You’re going for moisture and richness, not oily fruit.
Spread the dry cake mix evenly over the fruit. Do this gently so as to avoid smushing your fruit all around. You really want to keep this as even in the pan as possible. Dot the top of the cake mix with margarine. This time, you will want to be more generous. The margarine will melt and mix with the cake mix to make the cobbler top so you want enough to moisten all the cake mix. You may sprinkle the top with a bit of cinnamon and/or nutmeg, if you desire.
Put the pan into a 350 degree oven for 20 minutes. After twenty minutes, you’ll need to watch so you remove it before the crust gets too brown. Golden is what you’re looking for. You’ll need to use a fork or toothpick to test the fruit. It doesn’t need to be super soft but you’d rather not have it very crunchy. When the fruit is soft and the crust is golden, remove and cool the pan on a wire rack. This can be served warm with a scoop of no-sugar-added or dairy free ice cream or eaten plain. It’s nice cooled or even refrigerated. Since it can be made in advance and reheated (15 -20 seconds in the microwave per serving or put the whole pan back in a 325 degree oven for 5 minutes or so) or served cool, this can be made in advance. Handy!
Let’s mention some alternative ingredients. If you aren’t avoiding sugar, you can use pie filling in place of the fruit. This is very convenient and speeds up preparation quite a bit. If you are able to find no-sugar-added pie filling, you’re in great shape. You can also try canned fruit packed in its own juice. Just be aware that canned fruits and pie fillings will result in a softer fruit in your cobbler. This isn’t a bad thing but you should still know that when you choose your fruit. If you are having trouble finding a sugar free cake mix, you can use a baking mix such as Bisquick. Use the dry ingredients of the coffee cake recipe or biscuit recipe. If you use the biscuit recipe, add artificial sweetener to taste. Yes, you’ll have to taste the mix to get your proportions right. In my experience, artificial sweetener used in a 1:1 sweetener/sugar ratio is pretty darned sweet. If that suits your taste, perfect. Adjust the amount so it is appealing to you.
Now that you’ve feasted on wild, new pizza and alternative beef and vegetable soup, you’ve earned a bit of dessert.
So, until next time, let’s go eat that!
I spent so much time talking about experimentation last time, I never got around to leaving you a recipe! To make it up to you, I’m not going to yap at you at all today (well, I probably will but I promise I’ll keep it to a minimum). Instead, I’ll jump right in with a recipe for “Dairy-Free, No Sugar Added , Choose-a-Fruit Cobbler.” The preparation time on this varies quite a lot based on what fruit you choose. This is a fairly large cobbler but you can use a single layer cake mix and a 8"x8" or 9"x9" square pan to make a smaller dessert.
Here’s what you’ll need:
*9” x 12” baking pan (non-stick is nice if you have it but not required)
*Sugar-free White or Yellow Cake Mix for a two layer cake – make sure you read the ingredients label since some mixes do include dairy (if you can’t find this or don’t need to avoid sugar, we’ll discuss an alternative as we go. Of course, you can use a regular cake mix if sugar isn't a problem for you.)
*Margarine (I like the soft tub variety. If you can have dairy, you may certainly use butter if you prefer.)
*A few teaspoons artificial sweetener (or sugar if you prefer and it fits in your diet)
*Cinnamon, nutmeg and lemon juice (these are optional)
*Flour (1 or 2 tablespoons)
*Fruit - apples, berries, pears, peaches, any combination you like – enough to cover the bottom of your baking pan 1” deep
Pre-heat your oven to 350 degrees
First of all, choose a fruit. I like apple, peach and cherry, personally. Heck, you don’t even need to have just one. Apples pair very nicely with cherries or blueberries so you could use both. What other fruit combinations do you like? More importantly, what’s in season? We’ll be using a standard 9” x 12” baking dish, so you’ll want enough of whichever fruit you choose to cover the pan about 1” deep. Wash, peel, slice and prepare your fruit as appropriate. Most berries can be used as is. You’ll want to slice strawberries, though. Peeling is optional but I generally do peel my apples, peaches or pears. Not everyone cares for the texture of the peel in their cobbler. Do as you like seeing as you’re the one who gets to eat!
Lightly oil your baking dish with vegetable oil (if you’re soy sensitive, use canola or sunflower). Keep it very light by putting the oil on a paper towel and wiping the pan with the towel. If you’re using a non-stick pan, you can skip this step.
Arrange your fruit in the pan as evenly as possible. I like to have the fruit about an inch deep in the pan. If you put in less fruit, you’ll end up with more cobbler crust than fruit and it will be dry. Too much and the fruit won’t be done and soft before the crust gets too brown. If your fruit seems a bit dry (as in, it wasn’t particularly juicy in preparation), you can add two or three tablespoons of apple juice. Now is the time for some creative sniffing. I like to add cinnamon and/or nutmeg to my cobbler. You can also drizzle a bit of lemon juice to preserve color and add a bit of tartness. Sniff and see what smells good to you. If your fruit is on the tart side, you can even sprinkle a bit of artificial sweetener evenly over the pan. Sprinkle a tablespoon or so of flour evenly over the fruit. Dot the surface of the pan of fruit with small pieces of margarine. By small, I mean roughly 1/2”. Don’t get carried away with this. We’ll be using more on top of the crust so a little at this point will go a long way. The margarine can be pretty widely spaced. You’re going for moisture and richness, not oily fruit.
Spread the dry cake mix evenly over the fruit. Do this gently so as to avoid smushing your fruit all around. You really want to keep this as even in the pan as possible. Dot the top of the cake mix with margarine. This time, you will want to be more generous. The margarine will melt and mix with the cake mix to make the cobbler top so you want enough to moisten all the cake mix. You may sprinkle the top with a bit of cinnamon and/or nutmeg, if you desire.
Put the pan into a 350 degree oven for 20 minutes. After twenty minutes, you’ll need to watch so you remove it before the crust gets too brown. Golden is what you’re looking for. You’ll need to use a fork or toothpick to test the fruit. It doesn’t need to be super soft but you’d rather not have it very crunchy. When the fruit is soft and the crust is golden, remove and cool the pan on a wire rack. This can be served warm with a scoop of no-sugar-added or dairy free ice cream or eaten plain. It’s nice cooled or even refrigerated. Since it can be made in advance and reheated (15 -20 seconds in the microwave per serving or put the whole pan back in a 325 degree oven for 5 minutes or so) or served cool, this can be made in advance. Handy!
Let’s mention some alternative ingredients. If you aren’t avoiding sugar, you can use pie filling in place of the fruit. This is very convenient and speeds up preparation quite a bit. If you are able to find no-sugar-added pie filling, you’re in great shape. You can also try canned fruit packed in its own juice. Just be aware that canned fruits and pie fillings will result in a softer fruit in your cobbler. This isn’t a bad thing but you should still know that when you choose your fruit. If you are having trouble finding a sugar free cake mix, you can use a baking mix such as Bisquick. Use the dry ingredients of the coffee cake recipe or biscuit recipe. If you use the biscuit recipe, add artificial sweetener to taste. Yes, you’ll have to taste the mix to get your proportions right. In my experience, artificial sweetener used in a 1:1 sweetener/sugar ratio is pretty darned sweet. If that suits your taste, perfect. Adjust the amount so it is appealing to you.
Now that you’ve feasted on wild, new pizza and alternative beef and vegetable soup, you’ve earned a bit of dessert.
So, until next time, let’s go eat that!
Monday, June 16, 2008
Being Food Brave
Welcome back to “Hey, I Can Eat That.” I hope you had fun making pizzas. I’m sure you came up with some great new combinations. ‘Fess up, now. How many of you stayed with the tried and true pizza toppings? You know, peppers, cheese (or cheese substitute), sausage. That sort of thing. How many of you bravely reached for some new flavors? Anyone try apples and onions? How about pears with ham instead of pineapple? Leave us some comments and tell us what you tried and how you liked it!
Since we talked about substitutions last time, I thought we might take some time today to talk about being ‘Food Brave’.
So, what do I mean by that? Well, as I said last time, one of my two big rules for cooking with substitutions is to be willing to try new and different combinations. In fact, to really foster the right frame of mind about this, we probably ought to change our vocabulary. Instead of saying we are substituting ingredients, let’s say we are trying alternative flavors. Sounds a lot more palatable, doesn’t it? Right. So, that’s what I mean about being Food Brave. Food Brave cooks are actively looking for new flavor combinations. But not just any old combinations. We’re taking on the challenge of creating new tastes that will also meet some important dietary considerations.
Let me insert a side note here. As you’ve probably already noticed, I’m very big on having a positive attitude toward living with food allergies, sensitivities and special dietary needs. I don’t like to consider them as restrictions. Goodness knows, there are times when I would dearly love to pour myself a tall, cold glass of milk. But I can’t sit around whining about what I shouldn’t have. Neither can you. Nor do you need to be an object of pity. Raise your hand if you’ve spent entire meals with friends having to outline specifics of what you can and should not eat. Not a great deal of fun, is it? Instead, I’d much rather spend my time talking about all the great recipes I do cook and enjoy. I’m not really trying to be extra perky and sparkly about it. I’m just trying to keep things in a more positive perspective. I hope you’ll do the same.
Okay. So here we are, ready to be very brave in the kitchen, right? Right. Where do we start? The easiest way to begin is to start with recipes we already know and enjoy. How about soup? Pick your favorite. For the sake of discussion, I’ll talk about beef and vegetable. I have quite a few vegetable allergies. I need to stay away from tomatoes so I would choose a beef stock or I’d make a vegetable stock of my own (probably celery and onion). Carrots, corn and green beans are also things for me to avoid so I need to find things to take their place. Broccoli adds some great texture and color. Potatoes add some starch in place of the corn and cauliflower adds some good crunch, too. Additionally, I’ll load up on big flavor producers like celery, onion and minced garlic (you might want to go easy on the onion if you’re serving this to someone who tends to have GERD as too much onion can exacerbate the problem). Adding some whole grain pasta or brown rice gives it a nice nutty flavor. By now, I’ve added in so many other flavors and textures, I won’t really miss the things I didn’t add.
You’ll notice that my ingredients were pretty straightforward and that’s fine. But you can certainly go further. There are many varieties of beans you can add, for example. How about dicing up some zucchini or butternut squash? How would it be if we added some asparagus tops right near the finish (careful not to overcook those since they get mushy)? Hearts of palm? Diced jicama? Rutebegas? Or maybe turnips?
Not everything is going to taste good, unfortunately. Once in awhile, you will bravely go where probably no cook should ever have gone. Sometimes, experiments go awry. If this happens to you, don’t let it stop you from experimenting. Just see yourself as being in company with the likes of Thomas Edison who proudly claimed to have found some 10,000 ways not to make a light bulb. Right?
How do you choose which ingredients to use in an experiment such as our alternative beef and vegetable soup? Well, obviously, you’ll need to work with ingredients that are in keeping with the dietary needs of those eating. Make sure you’ve talked to your doctor or nutritionist about which foods are on your list and which are not and FOLLOW THEIR INSTRUCTIONS. I don’t want to hear about conversations like, “I know I shouldn’t eat turnips and now I’ll need to be on a steroid pack for the next month to control these hives, Doctor, but it isn’t my fault. Sandy said I had to be Food Brave so I put the turnips in the soup anyway.”
Also worth considering when you cook with alternative ingredients are your other senses. Food should look appetizing, smell wonderful and feel good in your mouth. Selecting a variety of colors in your ingredients will almost always result in a variety of smells and textures as well. Something to think about.
This also applies to selecting herbs and spices to supplement your recipes. Herbs and spices are generally what have me hanging over the stovetop, face as close to the pot as safety allows, clutching a handful of celery seed, minced garlic, crushed rosemary leaves or whatever else has come to hand. Smelling any of these ingredients separately can help you decide if it even appeals to you. But smelling them in combination can really give you a good idea of how the flavors will marry. Take the time to sniff!
So, after all that, who else is getting hungry for beef and vegetable soup? I’ll just be off to get the pot on the stove.
Until next time, let’s go eat that!
Since we talked about substitutions last time, I thought we might take some time today to talk about being ‘Food Brave’.
So, what do I mean by that? Well, as I said last time, one of my two big rules for cooking with substitutions is to be willing to try new and different combinations. In fact, to really foster the right frame of mind about this, we probably ought to change our vocabulary. Instead of saying we are substituting ingredients, let’s say we are trying alternative flavors. Sounds a lot more palatable, doesn’t it? Right. So, that’s what I mean about being Food Brave. Food Brave cooks are actively looking for new flavor combinations. But not just any old combinations. We’re taking on the challenge of creating new tastes that will also meet some important dietary considerations.
Let me insert a side note here. As you’ve probably already noticed, I’m very big on having a positive attitude toward living with food allergies, sensitivities and special dietary needs. I don’t like to consider them as restrictions. Goodness knows, there are times when I would dearly love to pour myself a tall, cold glass of milk. But I can’t sit around whining about what I shouldn’t have. Neither can you. Nor do you need to be an object of pity. Raise your hand if you’ve spent entire meals with friends having to outline specifics of what you can and should not eat. Not a great deal of fun, is it? Instead, I’d much rather spend my time talking about all the great recipes I do cook and enjoy. I’m not really trying to be extra perky and sparkly about it. I’m just trying to keep things in a more positive perspective. I hope you’ll do the same.
Okay. So here we are, ready to be very brave in the kitchen, right? Right. Where do we start? The easiest way to begin is to start with recipes we already know and enjoy. How about soup? Pick your favorite. For the sake of discussion, I’ll talk about beef and vegetable. I have quite a few vegetable allergies. I need to stay away from tomatoes so I would choose a beef stock or I’d make a vegetable stock of my own (probably celery and onion). Carrots, corn and green beans are also things for me to avoid so I need to find things to take their place. Broccoli adds some great texture and color. Potatoes add some starch in place of the corn and cauliflower adds some good crunch, too. Additionally, I’ll load up on big flavor producers like celery, onion and minced garlic (you might want to go easy on the onion if you’re serving this to someone who tends to have GERD as too much onion can exacerbate the problem). Adding some whole grain pasta or brown rice gives it a nice nutty flavor. By now, I’ve added in so many other flavors and textures, I won’t really miss the things I didn’t add.
You’ll notice that my ingredients were pretty straightforward and that’s fine. But you can certainly go further. There are many varieties of beans you can add, for example. How about dicing up some zucchini or butternut squash? How would it be if we added some asparagus tops right near the finish (careful not to overcook those since they get mushy)? Hearts of palm? Diced jicama? Rutebegas? Or maybe turnips?
Not everything is going to taste good, unfortunately. Once in awhile, you will bravely go where probably no cook should ever have gone. Sometimes, experiments go awry. If this happens to you, don’t let it stop you from experimenting. Just see yourself as being in company with the likes of Thomas Edison who proudly claimed to have found some 10,000 ways not to make a light bulb. Right?
How do you choose which ingredients to use in an experiment such as our alternative beef and vegetable soup? Well, obviously, you’ll need to work with ingredients that are in keeping with the dietary needs of those eating. Make sure you’ve talked to your doctor or nutritionist about which foods are on your list and which are not and FOLLOW THEIR INSTRUCTIONS. I don’t want to hear about conversations like, “I know I shouldn’t eat turnips and now I’ll need to be on a steroid pack for the next month to control these hives, Doctor, but it isn’t my fault. Sandy said I had to be Food Brave so I put the turnips in the soup anyway.”
Also worth considering when you cook with alternative ingredients are your other senses. Food should look appetizing, smell wonderful and feel good in your mouth. Selecting a variety of colors in your ingredients will almost always result in a variety of smells and textures as well. Something to think about.
This also applies to selecting herbs and spices to supplement your recipes. Herbs and spices are generally what have me hanging over the stovetop, face as close to the pot as safety allows, clutching a handful of celery seed, minced garlic, crushed rosemary leaves or whatever else has come to hand. Smelling any of these ingredients separately can help you decide if it even appeals to you. But smelling them in combination can really give you a good idea of how the flavors will marry. Take the time to sniff!
So, after all that, who else is getting hungry for beef and vegetable soup? I’ll just be off to get the pot on the stove.
Until next time, let’s go eat that!
Subscribe to:
Posts (Atom)